
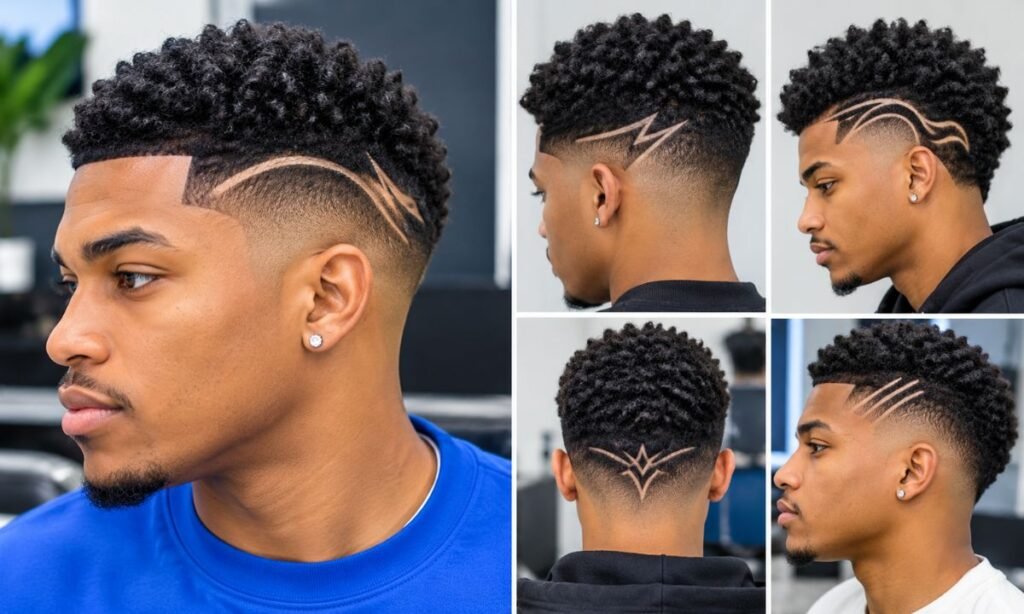

A mid taper fade with designs is a clean taper that starts around your temples, plus a shaved pattern cut into the short sides or back. Think a thin line, a zigzag, a star or even your initials. The fade keeps things neat, and the design adds your signature.
Ever sat in a barber chair and wished your cut had a bit more personality? Or worried that a shaved pattern might look cheap, grow out badly, or clash with your job? Those are fair concerns, and this guide answers them one by one.
You’ll get 13 design ideas, tips for your hair type and face shape, the exact words to use with your barber, and a simple upkeep plan. Grab a coffee. Let’s get into it.
What Is a Mid Taper Fade with Design?
A mid taper fade gradually shortens the hair on the sides and back. The shortening begins near the temple, so it sits halfway between a low taper and a high one. Your top stays longer, and the sides slide down to very short hair.
The “design” part is a hair design carved into that short zone. Barbers use a trimmer, a foil shaver or a straight razor to etch lines and shapes. The result looks a bit like hair tattoo art, but it grows out in a few weeks.
You’ll also hear it called a taper with a shaved pattern or hair art. Whatever the name, the recipe stays the same. Clean fade first, then the artwork on top of it.
Why Mid Taper Fade with Design Is So Popular in 2026
People want a cut that says something without shouting. A mid taper gives a tidy base, and a small design adds a personal twist. It feels custom, and you don’t need a bold color or a dramatic length to pull it off.
Social media plays a big part too. Short barber clips show a plain fade turning into a sharp pattern in under a minute. Those clips send thousands of guys into shops with a screenshot saved on their phones.
There’s a practical angle as well. The mid taper works with a suit, a hoodie or a team jersey. You can keep the design subtle for work, then show it off on weekends by pushing your top back.
Pros and Cons
Let’s be honest about both sides. The pros are real, but so are the trade-offs. Knowing them first saves you from a haircut you’ll regret.
Pros:
- Personal style: Nobody else walks around with your exact pattern.
- Clean base: The taper keeps the cut neat even when the design fades.
- Flexible length: Your top can stay short, medium or long.
- Works on most textures: Straight, wavy, curly and coily hair all take it well.
Cons:
- High upkeep: Designs blur within one to two weeks.
- Barber skill matters: A shaky hand leaves crooked lines you can’t hide.
- Cost: Artwork usually adds time and a few extra dollars to the bill.
- Less subtle at work: Some offices frown on bold patterns.
If you like low-effort hair, pick a simple line. If you love detail and don’t mind regular visits, go bigger. Both routes look great when the fade underneath is clean.
13 Best Mid Taper Fade with Design Ideas

Here are thirteen ideas, grouped by mood. Some are quiet and some are loud. Pick the vibe that matches your week, not just your Saturday night.
Bring a photo to your barber for any of these. Your head shape, hair growth and cowlicks will tweak the final look. That’s normal, and it’s actually a good thing.
Classic Line Designs
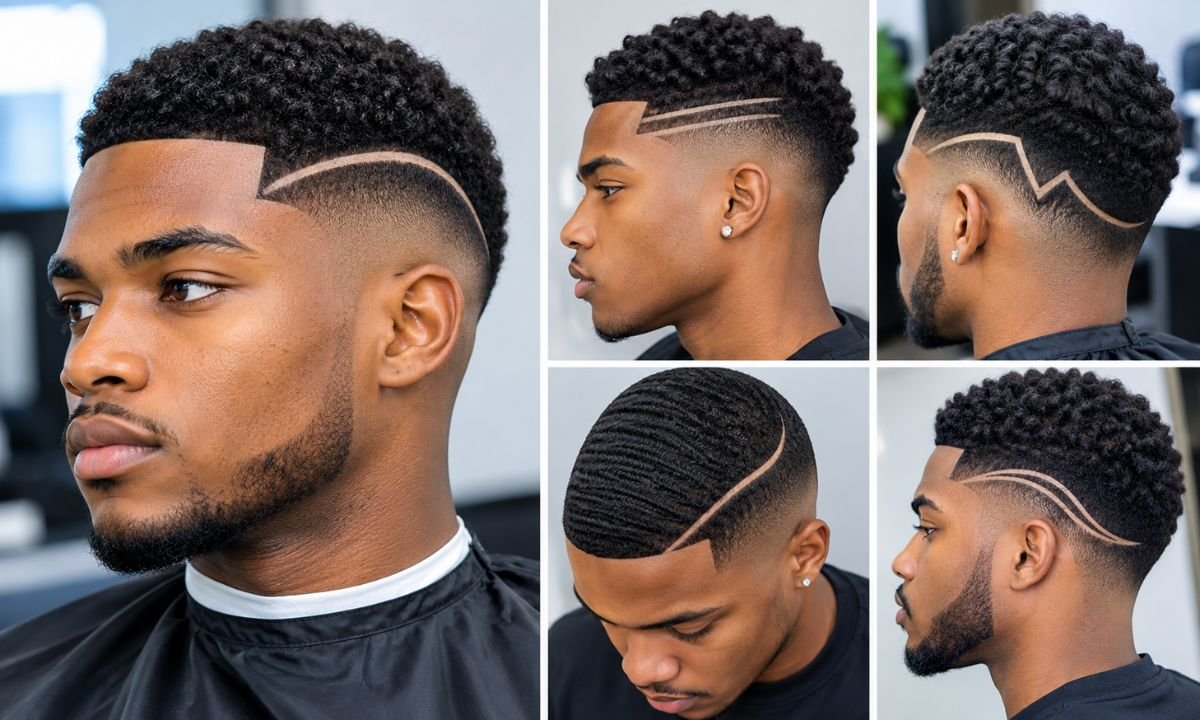
Lines are the easiest way to try a design. They look sharp, they grow out gracefully and almost every barber can cut them. If it’s your first time, start here.
1. Classic Line Designs
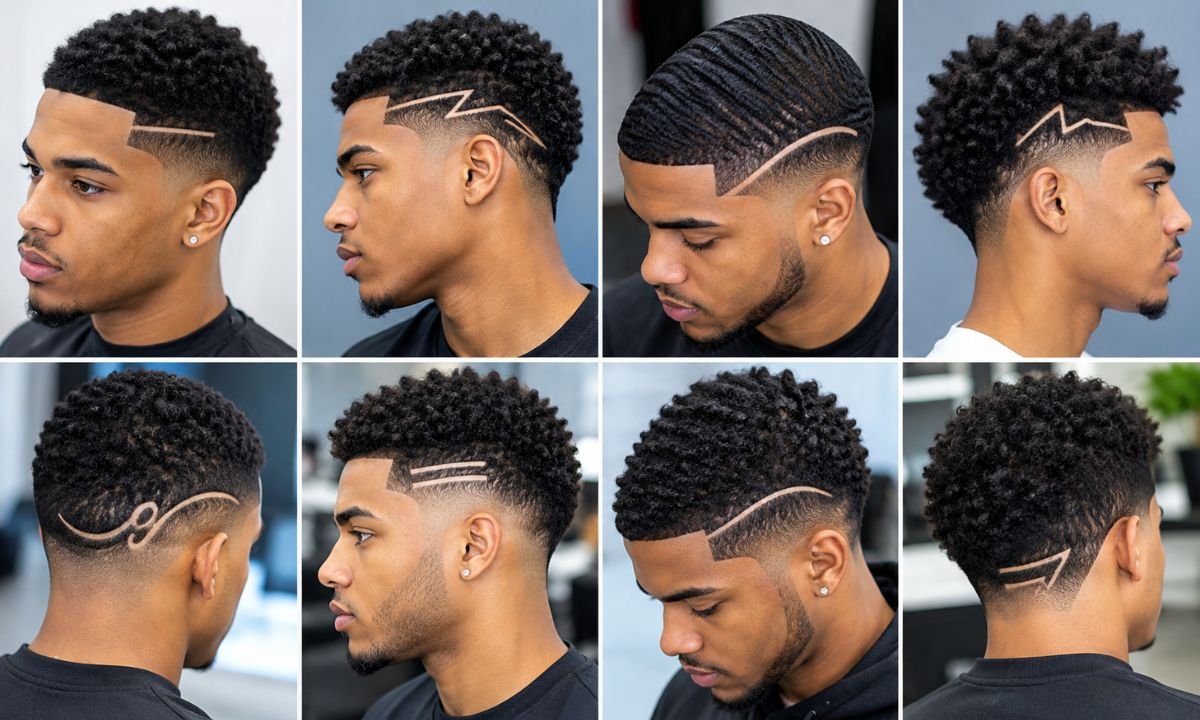
A single line is one thin razor cut, usually above the ear or near the temple. It looks like a subtle scar of style. It’s the least risky option on this list.
Ask for a straight line that follows the curve of your head. Keep it thin, about the width of a pencil tip. A thicker line can look heavy on a narrow head.
It suits professional settings very well. Most coworkers will notice the sharpness without knowing why. Touch it up every ten days and it stays crisp.
2. Double Line Design

Two parallel lines stack the idea and add rhythm. The gap between them is the key detail. Too tight and they merge, too wide and they look random.
Barbers often set the gap around one finger’s width. That gives you contrast without clutter. It looks great on fine hair because the lines add visual weight to the sides.
Expect more upkeep here. Two lines blur twice as fast as one. Plan a trim every week and a half if you want them razor clean.
3. Side Part Line Design

This one pairs a hard part with your fade. The barber carves a defined parting line on one side, then fades the hair below it. It echoes the classic gentleman cut with a modern edge.
It works best when your top is at least three centimeters long. You can comb it over or brush it back. The line gives you a clear boundary either way.
It’s also a smart fit for the office. The look says “neat” first and “edgy” second. That balance keeps managers and friends equally happy.
Symbol & Shape Designs
Shapes bring a bit of fun. They’re easy to read from across the room, which makes them great for social settings. Just keep them small enough to age well.
4. Cross Design

A cross is a simple vertical and horizontal line. It’s clean and symmetrical, and it holds up well on short hair. Many guys choose it for personal or faith reasons.
Place it at the side of the head, above the ear. Keep the arms thin for a sharper result. Thick arms tend to look like a patch.
Because the shape has crossing lines, it needs a steady hand. Ask your barber to mark it first with a pencil trimmer. Straight lines make or break this design.
5. Star Design

A star adds playfulness. It reads as a small badge on the side of your head. People notice it right away, so it’s a confident pick.
Five points are standard, but four-point stars look more modern. The design works best on darker hair, where the skin shows clearly. On very light hair the contrast fades.
Keep the star small, about two to three centimeters across. Anything larger can look like a sticker. A tight, clean star feels expensive.
6. Zigzag Design

The zigzag gives movement. It looks like a bolt of energy running through the fade. It’s the easiest “bold” design to carry off.
Ask for even angles and equal spacing. Uneven zigzags look like a mistake rather than a style. A good barber measures the pattern with the trimmer’s edge.
It pairs well with curly hair on top. The sharp lines balance soft curls. That contrast looks stylish without trying too hard.
Bold Statement Designs
Ready to turn heads? These designs ask for more skill and more attention. They look incredible, but only if the barber has the experience.
7. Spider Web Design
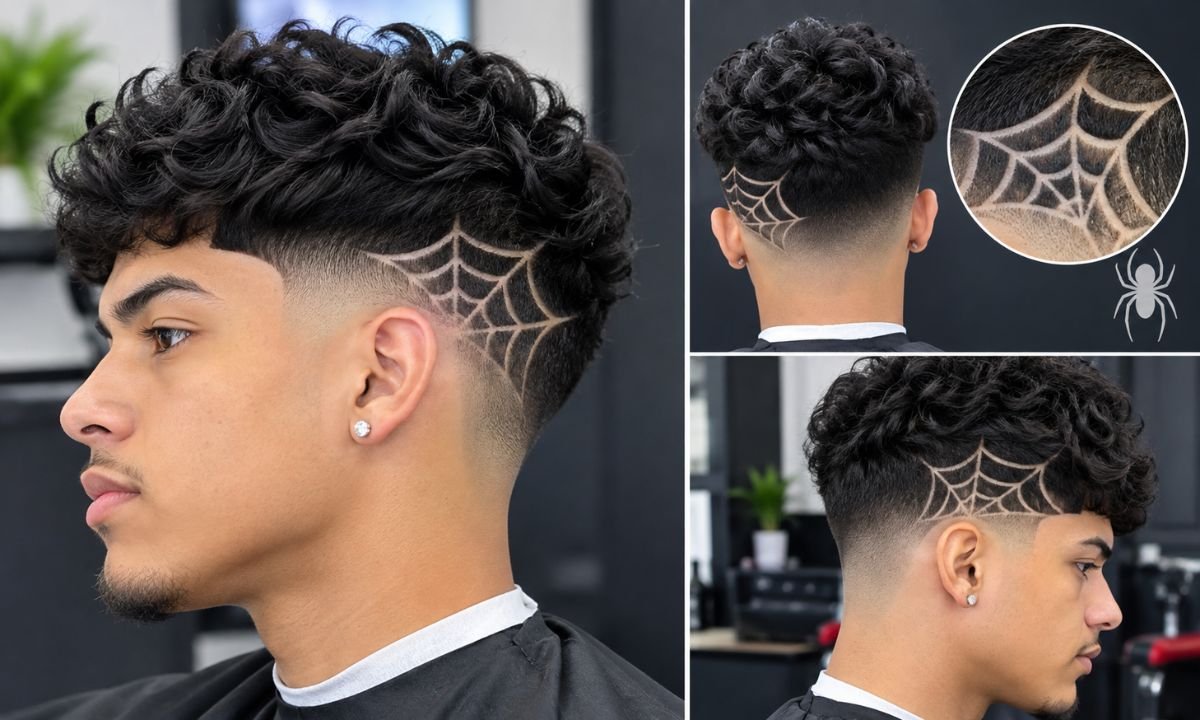
A spider web uses radiating lines and curved connectors. It looks intricate, and it takes time. Expect it to add twenty to thirty minutes to your appointment.
The pattern sits on the side of the head, usually behind the ear. It needs a foil shaver and a very fine trimmer. A rushed web ends up looking messy.
It’s a night-out cut rather than a nine-to-five one. If you wear it to work, tone it down with a simpler fade. Save the full pattern for weekends.
8. Geometric Pattern Design

Geometric designs mix triangles, diamonds and straight lines. They look modern and a little architectural. The pattern often wraps around the side and toward the back.
Symmetry matters here. If one side looks bigger, the whole thing feels off. Ask your barber to sketch the layout before cutting.
This idea works nicely on textured crops and spikes. The structured top matches the structured sides. Everything looks planned, and that’s the point.
Placement Variations
Where you put the design changes how people read it. A side design faces the room. A back design is a surprise for anyone behind you. Think about who’ll see it most.
9. Back Design
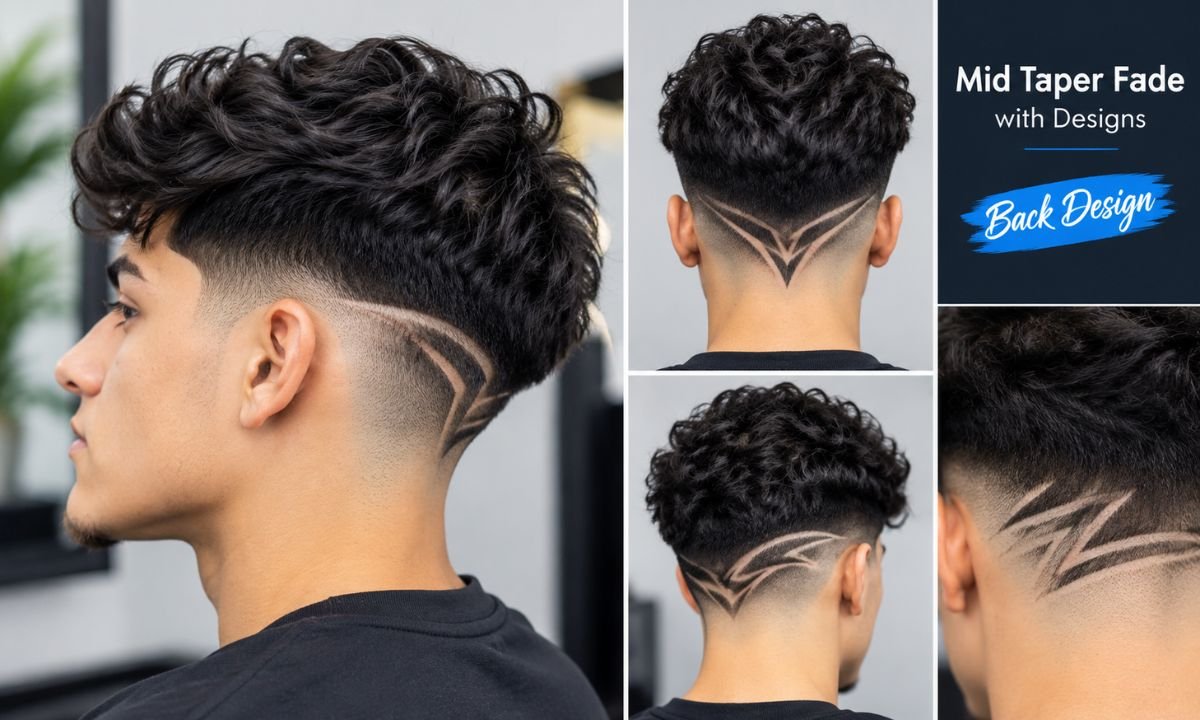
A back design sits on the nape or the lower back of the head. It’s a hidden piece of art that only shows when you turn around. It’s perfect for people who like a little secret.
The nape is curved, so patterns need good planning. Simple shapes like waves or arrows work best. Complex pieces can warp on the curve.
Keep your neckline neat to frame the design. A messy neck line distracts from the pattern. Ask for a clean block or tapered neckline to match.
10. Initial or Letter Design

Your initials can be shaved in as a quiet signature. A single letter looks neat and personal. It’s a favorite for gifts and special occasions.
Choose a block font with straight lines. Curly letters are harder to carve and blur quickly. A bold, simple letter reads clearly from a distance.
Place it at the side, slightly above the ear. Test the size with a washable pen first if you’re nervous. That small step prevents a lot of regret.
Nature & Pattern Designs
Not every design needs hard lines. Soft shapes can feel gentler and just as stylish. These two ideas bring a flowing character to the fade.
11. Lightning Bolt Design

A lightning bolt is a sharp zigzag with a clear start and end. It feels fast and energetic. Sports fans and gym regulars love it.
Keep the bolt slim and angled. A short, thin bolt looks cooler than a fat one. Place it near the temple so it rides along the fade.
It suits darker hair best, where contrast makes the shape pop. On light or thin hair it can look faint. Ask your barber to deepen the fade first to help it stand out.
12. Wave Pattern Design

Wave patterns use two or three gentle curves that echo the shape of the head. They look relaxed and modern. They also hide minor growth better than hard lines.
They work well with wavy hair on top. The sides echo the movement above. The whole head feels connected.
Because curves are harder to carve than straight lines, pick an experienced barber. Ask to see photos of past wave work before booking. A few minutes of research saves weeks of regret.
Subtle & Office-Friendly Designs
Not everybody wants a loud cut. Some of us have clients, managers and grandparents. This group of designs says “polished” instead of “wild”.
13. Notch or Hairline Cut
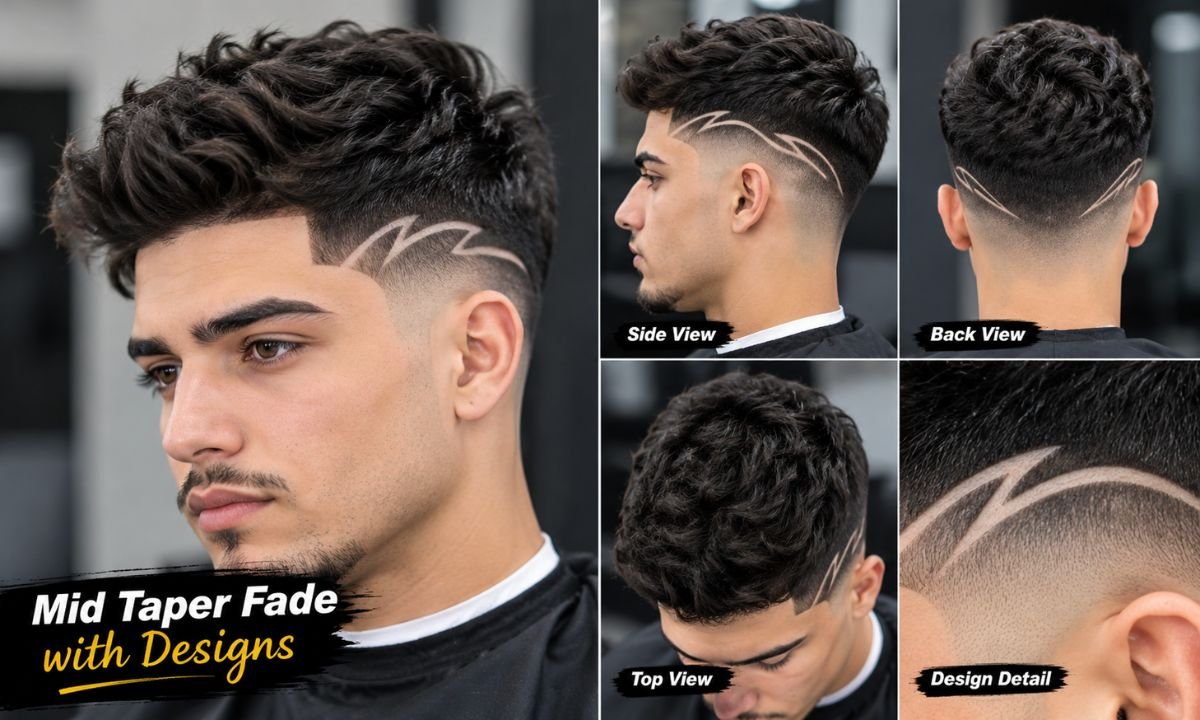
A notch is a tiny break in the hairline, usually near the temple. It looks like a hint rather than a statement. Most people won’t realize it’s deliberate, but they’ll feel the sharpness.
It takes seconds to carve. It also grows out evenly, so you don’t get an awkward phase. That makes it ideal for busy weeks.
Use it as a stepping stone. If you love it, move on to a single or double line next time. It’s an easy way to test your comfort with hair art.
Mid Taper with Design on Back

A back design is the choice of the quiet showman. You don’t see it in the mirror, but others do. It’s a clever way to wear a bold pattern without scaring your boss.
Waves, arrows, stars and small initials all work on the nape. Keep the fade smooth so the artwork sits on a clean canvas. A messy fade will ruin even the best design.
Ask your barber to blend the taper right to the neckline. Then request a clean, defined edge to frame the design. Skip heavy gels at the back, because product can hide the details.
Mid Taper with Design on Side

The side is the classic spot. It’s visible, easy to maintain and flattering on almost everybody. Most designs in this guide work best here.
Place the artwork just above the ear and below the temple fade line. That sits in the sweet spot where the skin is lightest and the pattern shows clearly. Higher up, the hair is longer and the lines blur.
If you wear glasses, check how the arms sit. A thick frame can cover a small design. Show your barber your glasses before they start.
How to Choose the Right Design for Your Hair Type

Your hair texture decides how a design looks and how long it lasts. Straight hair shows lines clearly. Coily hair hides them differently. Let’s break it down so you can pick the right match.
A good rule: the denser your hair, the bolder the design can be. Thin hair shows scalp, which can soften detail. Always tell your barber what your hair does naturally.
Straight Hair
Straight hair is the best canvas for sharp lines. It lies flat, so the fade looks smooth and the design stays crisp. Single and double lines look especially clean.
The catch is that straight hair shows every mistake. A small wobble in a line is visible from five feet away. Choose a barber who works with a steady hand.
Add a light matte paste on top to keep things neat. Don’t overdo it, or your pattern will lose attention. Let the sides do the talking.
Curly Hair
Curly hair adds volume and texture, so the design sits below a soft crown. The contrast looks lovely. A zigzag or geometric pattern pairs well with spirals.
Curls can cover parts of the artwork. Keep the fade tight near the ears so the design shows. You’ll need a clear zone for it to read.
Use a curl cream on top to keep definition. It adds shine without weight. Your curls frame the artwork rather than fight it.
Wavy Hair
Wavy hair is relaxed and flexible. It suits flowing designs like waves and soft curves. A mid taper keeps the sides tidy while the top moves freely.
Be careful with very high contrast. Wavy hair can look messy next to harsh geometric lines. Mixing curves with curves feels more natural.
A light sea salt spray gives you texture without crunch. Scrunch it in and let it dry. You’ll get movement that matches the pattern below.
Coily and Afro-Textured Hair
Coily hair holds shapes beautifully. Designs look sharp and sculptural on dense, tightly coiled hair. This is where bold geometric and spider web designs shine.
The fade needs to be smooth and consistent. Barbers who specialize in afro-textured hair know how to blend without patches. Ask for photos of their previous work on coily textures.
Moisture matters here. Dry hair breaks and ruins the clean edge. Keep a leave-in conditioner handy and avoid harsh shampoos.
Fine Hair
Fine hair can look thin, but a design adds visual structure. A double line or side part line makes the sides feel fuller. It tricks the eye into seeing more density.
Avoid tiny, complex patterns on very fine hair. They tend to look faint and patchy. Stick with bold, simple shapes.
Use a volumizing powder on top to add lift. The contrast between a full top and a sharp side looks striking. It’s a small trick with a big payoff.
Best Mid Taper Fade Designs by Face Shape
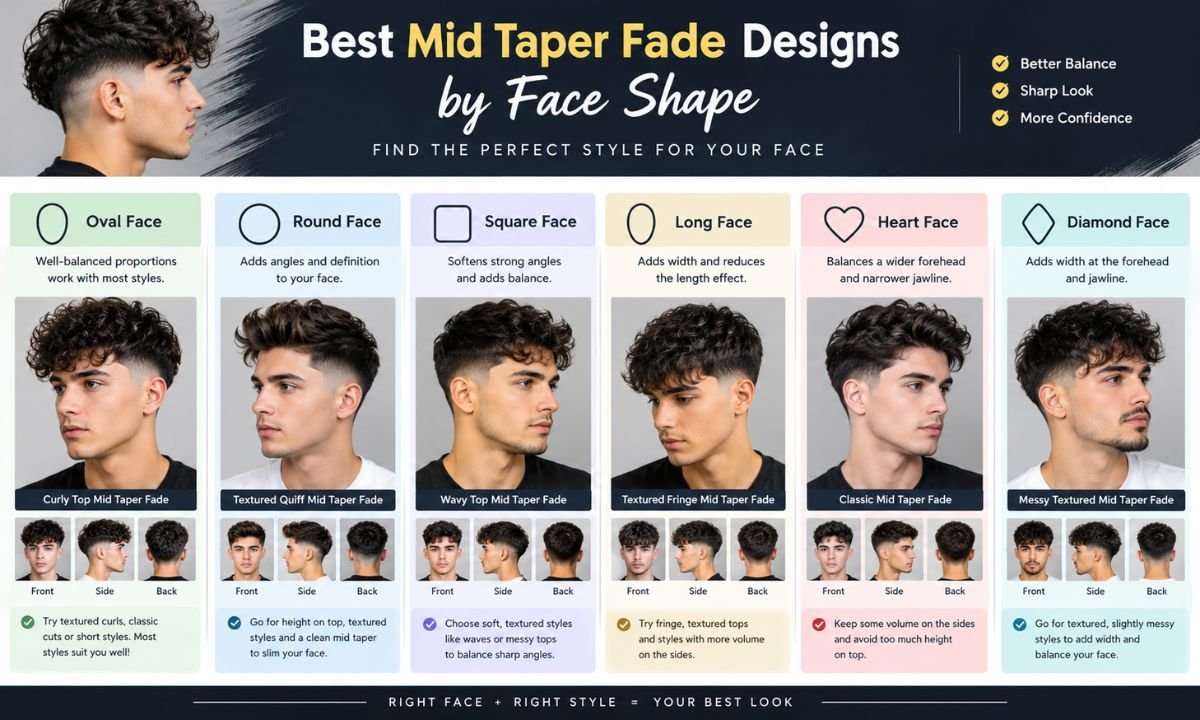
Face shape guides how much height, width and detail you want. The right design can balance your features. A wrong one can exaggerate what you’d rather soften.
Don’t treat these as strict rules. Think of them as starting points. Your barber can adjust once they see your face.
Oval Face
Oval faces are the easiest to style. Most designs work. Try a star, a cross or a geometric pattern without much worry.
Keep the proportions balanced. Too much height on top can stretch the face. A modest top with a clean taper looks natural.
Round Face
Round faces look best with height and sharp angles. A zigzag or lightning bolt adds structure. Keep your top a little longer and brushed up.
Avoid wide patterns that add width to the sides. Slim designs keep the face looking lean. A tight mid taper helps too.
Square Face
Square faces already have strong angles. Softer designs like waves balance them well. A curved line can soften the jaw visually.
Too many hard geometric shapes can feel heavy. Mix one sharp detail with soft curves. The result looks confident but not stern.
Heart-Shaped Face
Heart-shaped faces are wider at the forehead and narrow at the chin. Keep the design low and compact. A single line near the ear brings balance.
Don’t add bulky patterns near the temples. They emphasize the width at the top. A sleek taper with a small notch feels just right.
Long Face
Long faces gain from width, not height. Keep the top short or medium. Place designs horizontally to stretch the sides visually.
A double line or a wave pattern works well. Avoid tall quiffs or heavy volume. They exaggerate the length.
Diamond Face
Diamond faces have wide cheekbones and narrow foreheads. A fringe or textured top can soften the cheekbones. Add a compact design near the temple.
Avoid designs that stretch outward at cheek level. Simple lines and small symbols work best. Keep the look compact and clean.
Rectangular Face
Rectangular faces are long and angular. Medium height with a fuller top suits them. A side part line or geometric pattern adds balance.
Skip very tall styles. Choose designs that add width rather than length. Your barber can fine-tune the placement.
Best Mid Taper Fade Designs by Age Group

Age shapes how bold you go. A teenager has more freedom than a manager. Neither is better, but each has different limits and goals.
Think about your daily world. School rules, office policies and family events all matter. Choose a design that fits the room you spend the most time in.
Teenagers
Teens can experiment more. Lightning bolts, stars and zigzags feel fresh and playful. Hair grows quickly, so mistakes fade fast.
Check school dress codes first. Some schools restrict visible hair art. Pick a back design if rules are strict.
Teens also tend to love change. Try a new pattern each month. It’s a cheap way to learn what suits you.
Young Men
Young men can mix bold and clean. A geometric pattern or spider web looks great for nights out. A single line handles daily life.
This is the age to test styles and find your signature. Keep a photo diary of what you tried. You’ll quickly see which cuts you loved.
Don’t forget your career. A design that feels harmless today might get stares in an interview. Keep a subtle backup plan.
Professional Men
Professionals do best with understated details. A single line, a notch or a side part line looks polished. It signals care without drawing attention.
Pair the cut with a short, neat top. Matte products work best. A glossy finish can look too casual for formal settings.
Weekends can be wilder. Some men use a back design that hides under collars. That gives you both worlds in one haircut.
How to Ask Your Barber for a Mid Taper Fade with Design
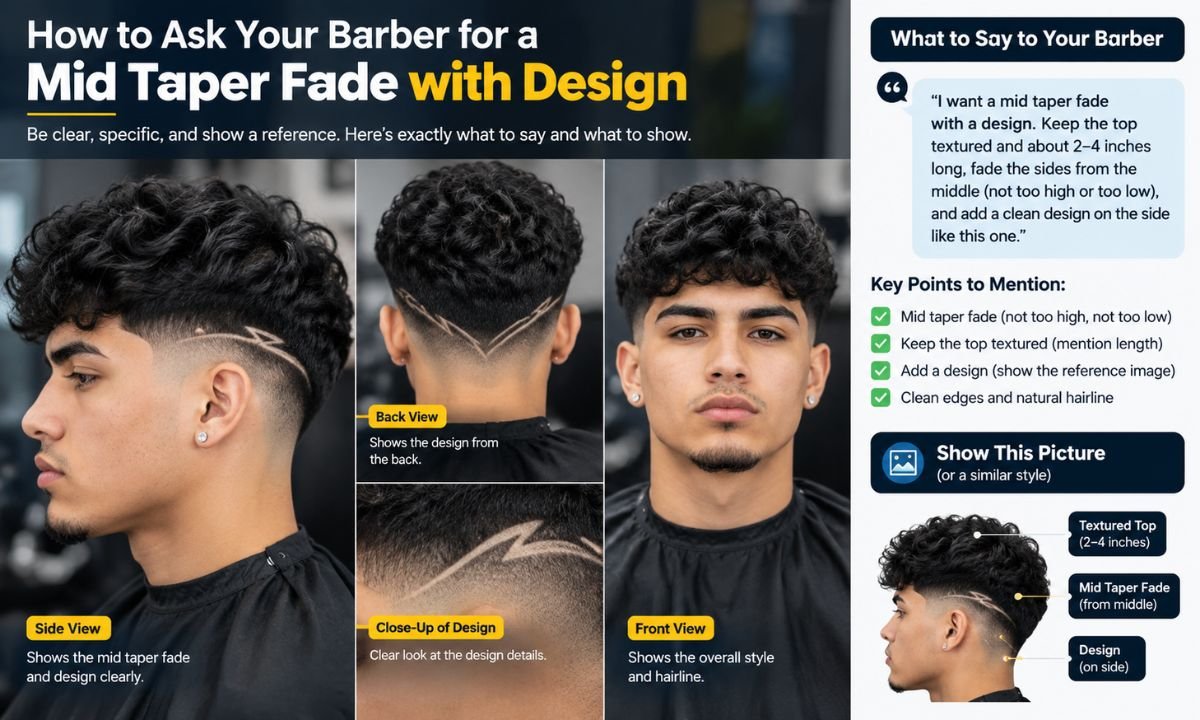
Most bad cuts come from poor communication. You say “a design” and the barber imagines something different. A short, clear request fixes it.
Bring two or three reference photos, ideally from several angles. Point out what you like in each. Photos beat words every time.
Here are phrases that work:
- “I’d like a mid taper fade starting at the temple.”
- “Keep the top at about [your length] and blend the sides smoothly.”
- “Add a single thin line above my ear, about [size].”
- “Please sketch the design first so I can approve it.”
- “I want it to look neat even after two weeks.”
Also tell them how you style your hair daily. If you wear a hat or glasses, mention it. These details change placement and size.
Ask about price and time before the cut. Detailed designs can add twenty minutes. Knowing the cost avoids awkward surprises at the register.
Mid Taper Fade with Design: Video Guide
Watching a video helps you understand the process before you sit down. You see how the barber maps the fade, picks a guard and carves the pattern. It also shows how fast good barbers work.
When you watch a tutorial, look for these steps in order: sectioning the hair, setting the fade line, blending with a trimmer, then sketching the design with a pencil trimmer. If a clip skips the blending, look for another one.
Pause at the shaping stage and note the clipper angles. Look at how the barber holds the trimmer for lines. These details teach you what to ask for, and what to expect in the chair.
If you plan to publish your own video guide on this topic, a short walkthrough of the barber consultation is a great opening scene. Viewers love real examples. It builds trust and keeps people watching.
Common Mid Taper Fade Design Mistakes to Avoid
Even great ideas fail when the details slip. Most regrets come from a few repeating errors. Avoid these and you’ll save yourself weeks of grumbling.
Mistake 1: Picking a design that’s too big. Oversized art swallows the fade. Keep patterns compact and let the taper breathe.
Mistake 2: Skipping the sketch. Always ask for a pencil mark first. If it’s off, you fix it before the razor touches skin.
Mistake 3: Wrong barber for the job. Not every barber does artwork. Look through their portfolio before booking.
Mistake 4: Ignoring your hair type. Light, fine hair can’t hold a tiny detailed pattern. Choose shapes that match your density.
Mistake 5: No plan for upkeep. A design that looks perfect on Saturday looks messy by Friday. Book your next visit before you leave.
Mistake 6: Copying a photo exactly. Heads differ. A great design on someone else needs adjusting for you.
How to Maintain a Mid Taper Fade with Design

A design cut is a bit like a lawn. It looks sharp right after the trim, then grass sneaks in. A small routine keeps it neat longer.
Wash your hair gently and avoid scrubbing the sides too hard. Pat dry instead of rubbing. Rough towels can irritate freshly shaved skin.
Use a light moisturizer on the shaved area if your skin feels dry. It prevents flaking and razor bumps. Healthy skin makes the pattern look sharper.
Touch-Up Frequency
Most designs need a touch-up every one to two weeks. The fade itself lasts about two to three weeks. Detailed art loses its edge sooner than a plain taper.
If you love a perfectly crisp look, book a quick lineup between full cuts. Many barbers offer short sessions for this. It costs less and keeps you sharp.
If you’re happy with a softer look, stretch it to three weeks. The design will blur, but it’ll still look intentional. Just don’t wait longer than a month.
At-Home Touch-Ups
A small beard trimmer can clean the neckline and edge of the design. Use it lightly and never cut into the fade. Stay on the outside of the pattern.
Good lighting and two mirrors help you see every angle. Go slow and take small passes. If you doubt a move, skip it.
Never try to redraw lines yourself unless you’ve practiced. One slip leaves a mark you can’t undo. It’s better to wait for your barber.
Everyday Product Care
Choose products that don’t clog the shaved area. Water-based pomades and light creams wash out easily. Heavy waxes can hide the design and irritate the skin.
Wear a clean cap or hat when needed. Dirty headwear can cause bumps and breakouts. Wash it regularly.
Sun matters too. Freshly shaved skin burns easily. A little sunscreen on the sides protects both the skin and the pattern.
Mid Taper Fade with Design vs Other Styles

Not sure the design is worth it? Compare it with your other options. You might love the plain taper more, or you might never go back. Here’s how they stack up.
The question isn’t which one is better. It’s which one fits your life right now. Both can look excellent.
Design vs Plain Mid Taper
A plain mid taper is clean, quick and easy to maintain. It suits every workplace and takes no extra time. You can stretch visits to three weeks without worry.
The design version adds personality and conversation. It also adds cost, time and upkeep. You’ll visit the barber more often.
Think of it as a plain white shirt versus a printed one. Both work. One just says more about you.
Design vs the 3-2-1 Guard Technique
The 3-2-1 guard technique is a clipper method where a barber steps through guard sizes, such as a number 3, then 2, then 1, to blend the sides. It’s a way of building a smooth fade, not a pattern. Many barbers use it as the base layer.
A design sits on top of that base. In other words, the 3-2-1 method is how the fade gets made, while the design is the artwork. You can have one without the other, or both together.
If you’re a DIY person, the guard technique is easier to learn. Designs need a pro’s touch. Use guards at home and leave the artwork to the barber.
How Much Does a Mid Taper Fade with Design Cost?
Prices vary by city and barber. A plain fade often costs less than a detailed design. Expect to pay a bit extra for artwork, especially if it’s complex.
Simple lines usually add a small fee. Intricate patterns like spider webs or geometric art cost more because they take time. Always ask before you sit down.
Budget for upkeep too. If you need touch-ups every week, the cost adds up. Some barbers offer membership or package deals, which can lower the price.
Frequently Asked Questions
What is a mid taper fade with design?
It’s a mid taper fade that includes a shaved pattern, such as a line, shape or letter. The fade starts around the temples and blends down. The design is cut into the short hair.
How long does a mid taper fade with design last?
The fade holds its shape for two to three weeks. The design usually blurs within one to two weeks. A quick touch-up keeps it sharp.
Can I get a design on any hair type?
Yes, but results vary. Straight and coily hair show patterns clearly. Fine or very light hair needs bolder shapes.
Will a design look unprofessional at work?
Not if you pick it carefully. A single line, a notch or a back design looks polished. Check your office rules to be safe.
How much does a hair design cost?
It depends on the barber and the complexity. Simple lines cost less, and detailed art costs more. Ask for a quote first.
How do I stop my design from growing out messy?
Book regular touch-ups and keep the skin moisturized. Avoid heavy products that hide the lines. Choose simple designs if you can’t visit often.
Can I do a design at home?
You can clean edges at home, but don’t carve new patterns without experience. Mistakes are hard to hide. Let a pro handle the design.
Is a mid taper better than a low or high taper for designs?
A mid taper gives you balanced space for artwork. A low taper leaves less room, and a high taper can feel extreme. Many barbers prefer mid for pattern work.
Conclusion
A mid taper fade with design gives you a clean, modern base and a pinch of personality. Whether you choose a single line or a bold spider web, the key is a steady barber and a plan for upkeep. Start small, then experiment.
Match the design to your hair type, face shape and daily life. Bring photos, ask for a sketch, and book your touch-ups early. Do that, and you’ll walk out looking sharp every time.
So which design are you trying first? Drop it in the comments, share this guide with a friend who needs fresh ideas, and tell us how it turned out. We update this post often as 2026 trends change.
