
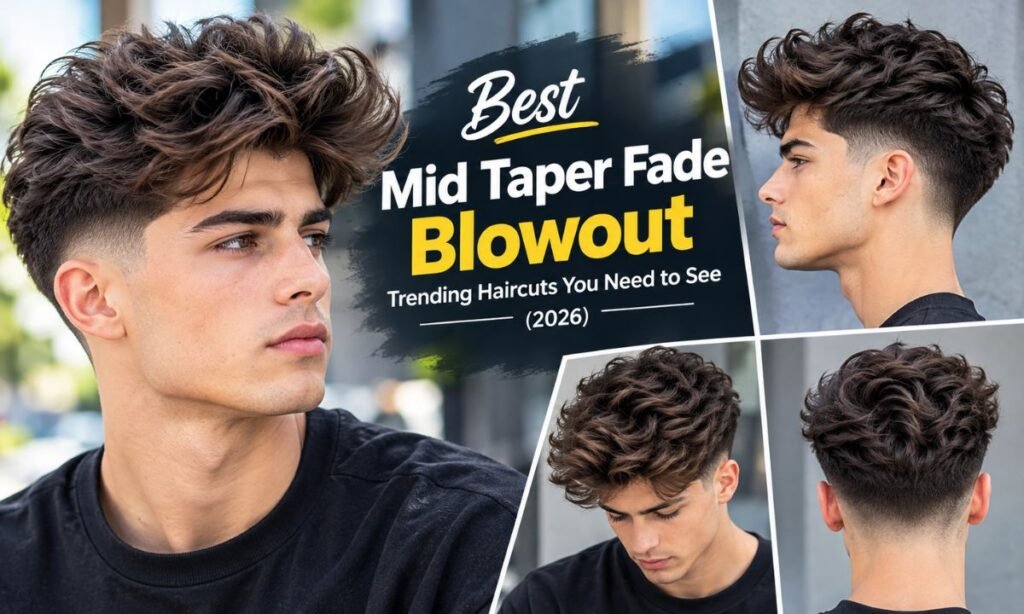
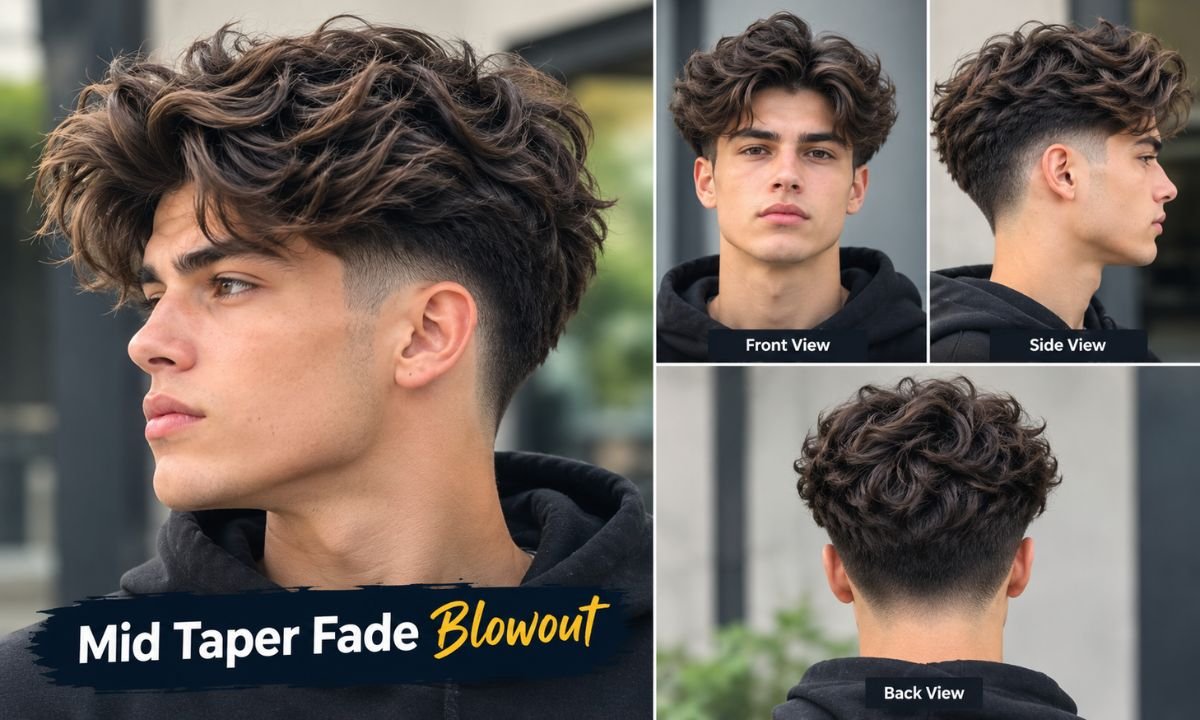
Will a mid taper fade blowout work on your hair? Probably yes, if you’ve got at least 3 to 4 inches of length on top. It pairs a neat tapered side that starts around the temples with a voluminous, blow-dried top that sweeps up and back.You’ve likely seen it everywhere. It looks sharp at the office, easy at the gym, and effortless on a night out. The catch is that it only looks effortless when the cut and the styling both land.Mid Taper Fade Blowout cut explained !
This guide walks you through the whole thing. You’ll learn what the cut actually is, how to ask for it, and how to style it at home. You’ll also see what goes wrong and how to fix it before your next appointment.
What is a mid taper fade blowout?
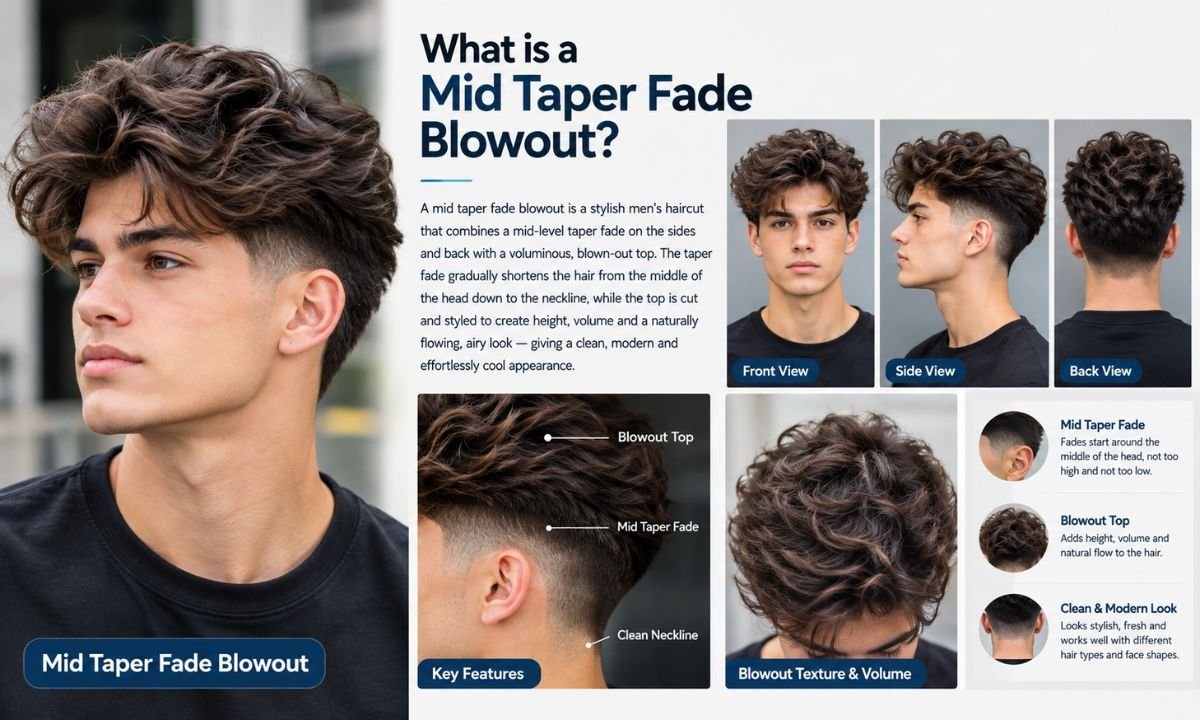
A mid taper fade blowout combines two ideas. The sides and back get a gradual taper that starts at mid height on your head. The top stays longer and gets blow-dried for lift, body, and movement.
Think of it as a clean frame around a soft, full center. The sides stay tidy while the top does the talking. That contrast is why the cut photographs so well.
It also works for almost any lifestyle. You can wear it slicked, tousled, or somewhere between. Few haircuts give you that much range.
What “mid taper fade” means at the barbershop
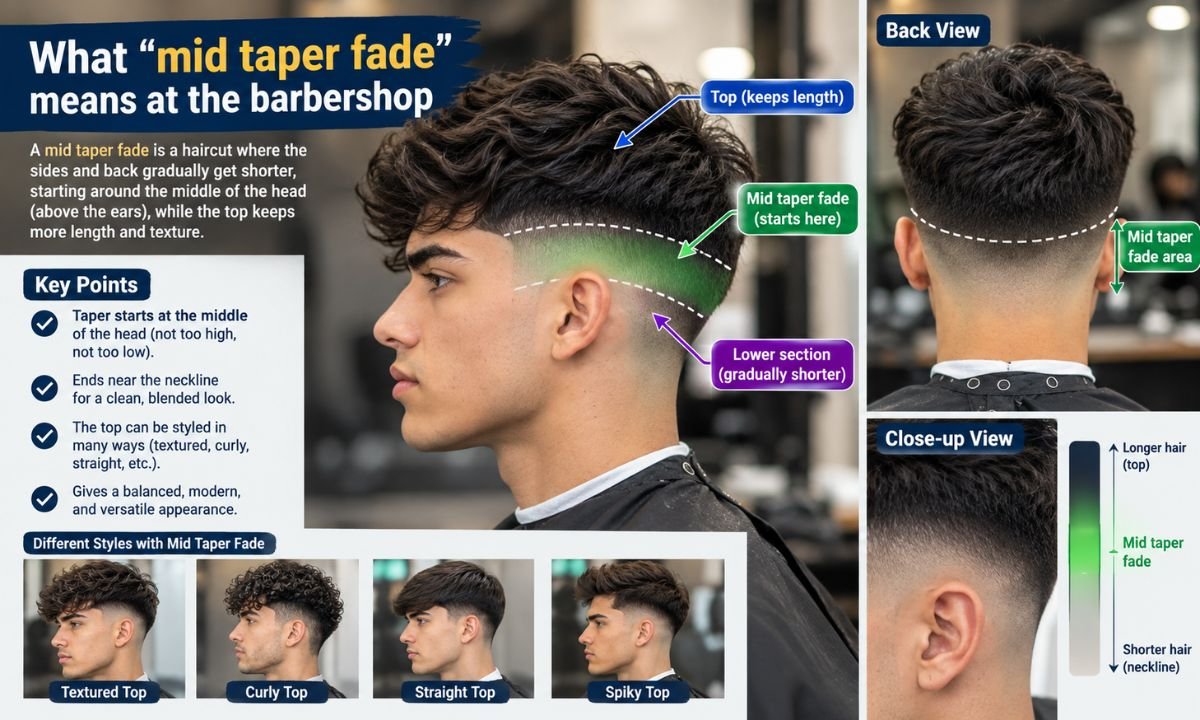
“Mid” describes where the fade line starts. On a mid taper, the shortest part begins roughly at the temple or just above the ear. That’s about halfway up the side of your head.
“Taper” means the length changes slowly instead of dropping to bare skin. Most barbers leave a little hair at the neckline and sideburns. A taper is subtler than a skin fade, which is why many people prefer it for daily wear.
Here’s an everyday example. Say your barber uses a #1 guard near the bottom and blends upward to a #3 or #4. You get a smooth gradient without a harsh line. The result looks clean even on week three.
What makes it a blowout instead of just a textured top
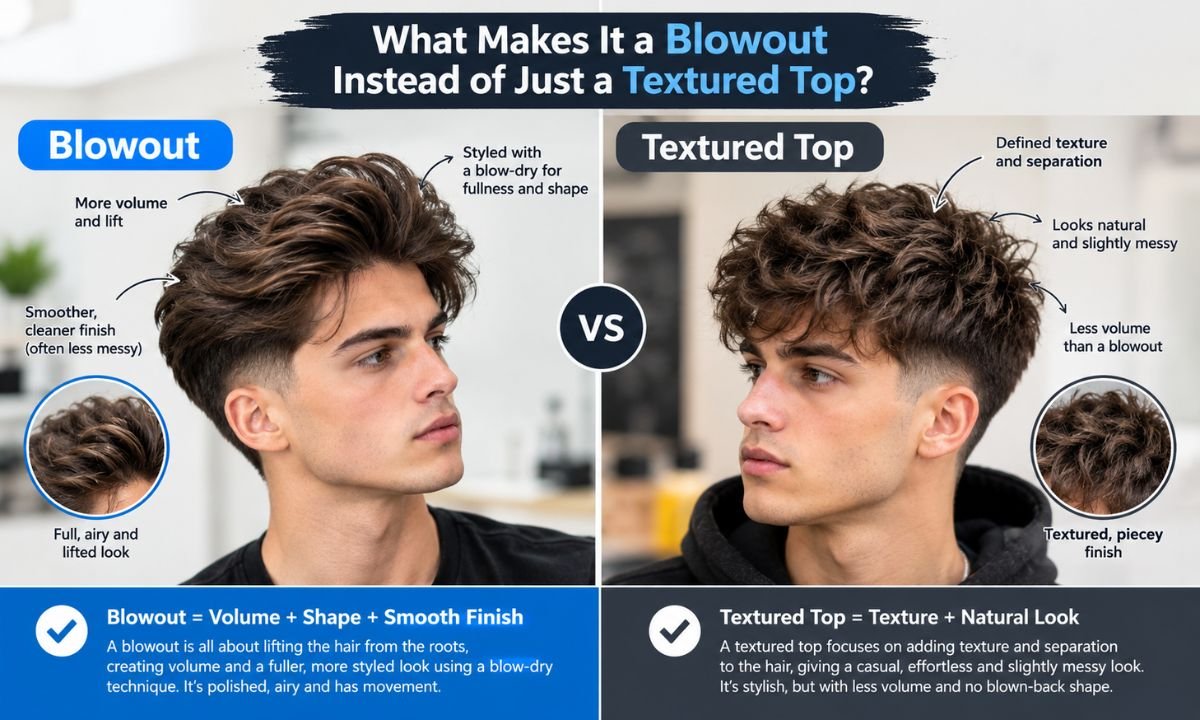
A textured top gets its shape from cutting. The barber uses scissors or a razor to add choppy layers, then you add product. A blowout gets its shape from heat and airflow. You dry the hair upward and back so it stands up with natural volume.
The cut still matters, of course. A blowout needs enough length, usually 3 to 5 inches, plus layers that let the hair lift. Without them, the dryer has nothing to work with.
You’ll hear people call it a blow-dried fade or a “fluffy taper.” Same idea, slightly different words. Bring photos to avoid confusion, and we’ll cover that soon.
Is a mid taper fade blowout right for your hair?
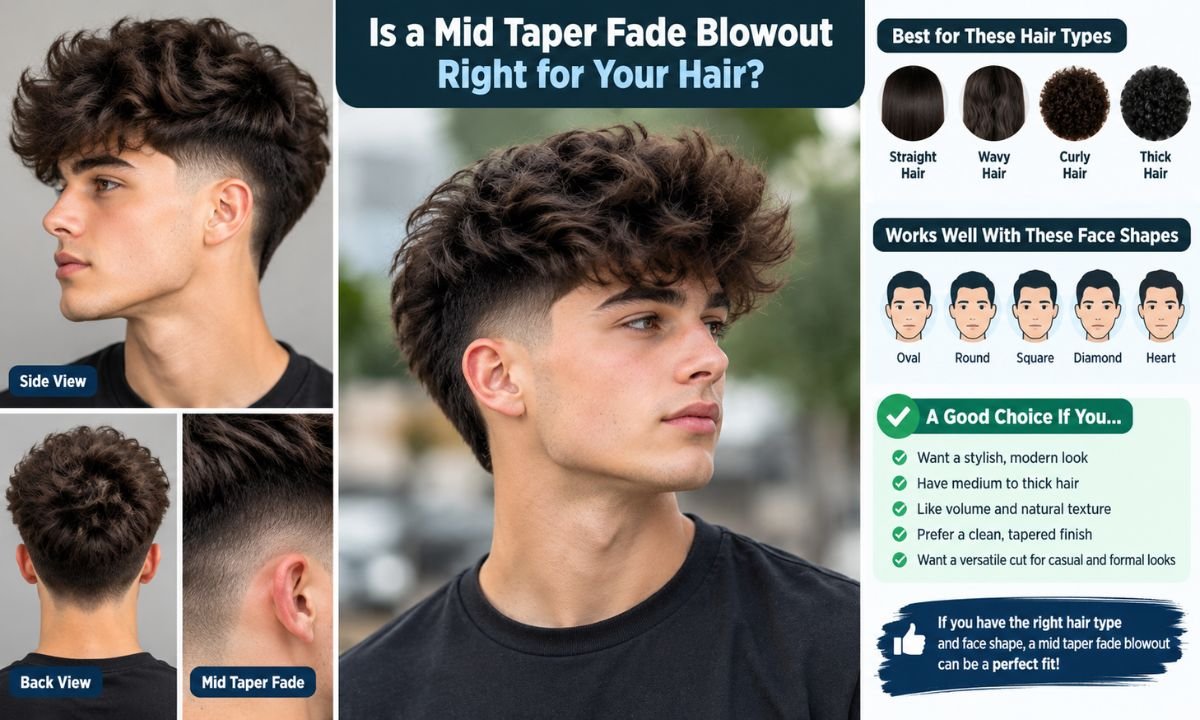
Short answer: most hair types can pull it off. The cut just changes depending on your texture, thickness, and growth patterns. A good barber adjusts the plan instead of copying a photo exactly.
Before you book, ask yourself three things. How much time do you want to spend each morning? Does your hair stand up easily or fall flat? Do you have a stubborn crown swirl? Your answers shape the whole haircut.
Don’t worry if you’re unsure. The sections below break down each hair type and each common challenge. You’ll know what to expect before you sit down.
How the cut changes for straight, wavy, curly, and coily hair
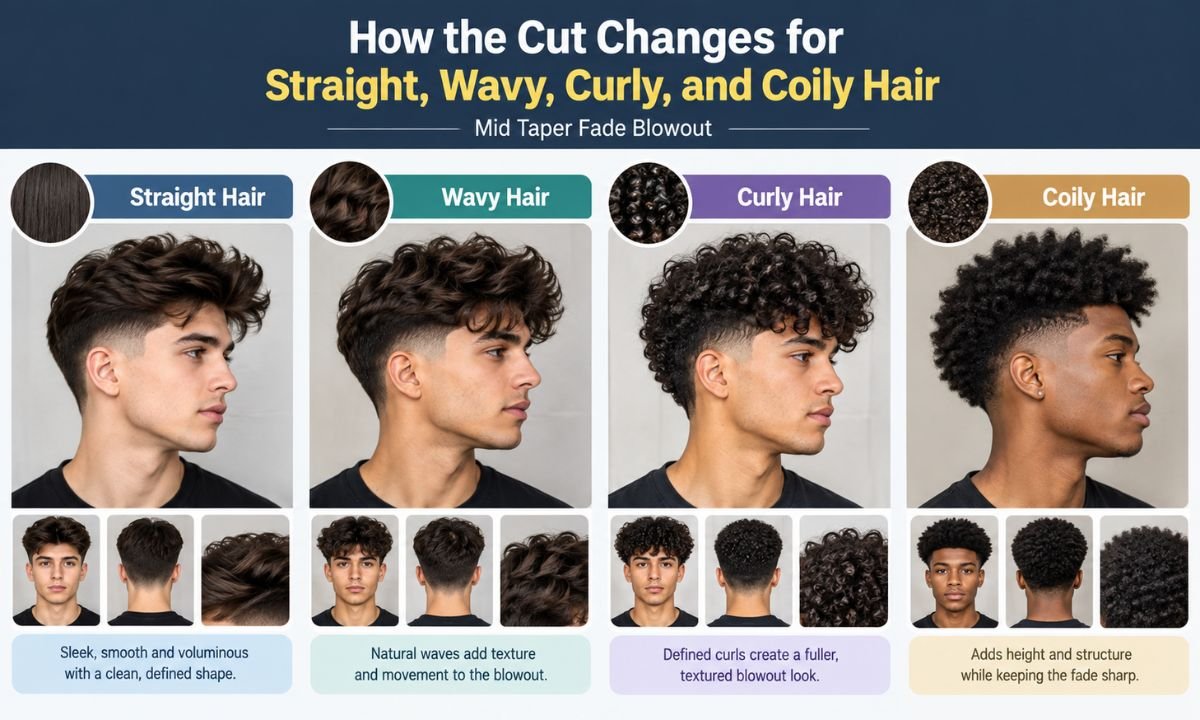
Every texture behaves differently under a blow dryer. Straight hair lifts fast but falls fast. Curly hair holds shape but needs moisture. Your barber should pick the top length and layering with that in mind.
Here’s a quick snapshot before we get into detail.
| Hair type | Ideal top length | Main goal | Biggest risk |
| Straight | 3 to 4 inches | Root lift and texture | Going flat by noon |
| Wavy | 3 to 5 inches | Defined movement | Frizz and puffiness |
| Curly | 3 to 6 inches | Shape and curl definition | Dryness and shrinkage |
| Coily | 2 to 5 inches | Stretched, even volume | Uneven stretching |
Straight hair

Straight hair responds quickly to heat. You can build root lift in about two minutes. The trade-off is that straight strands can collapse once humidity or sweat shows up.
Ask for internal layers or light texturizing on top. They give the hair some grip. A sea salt spray before drying helps it hold shape longer.
Keep the top around 3 to 4 inches. Longer, and the weight pulls it down. Shorter, and you lose the blowout effect.
Wavy hair
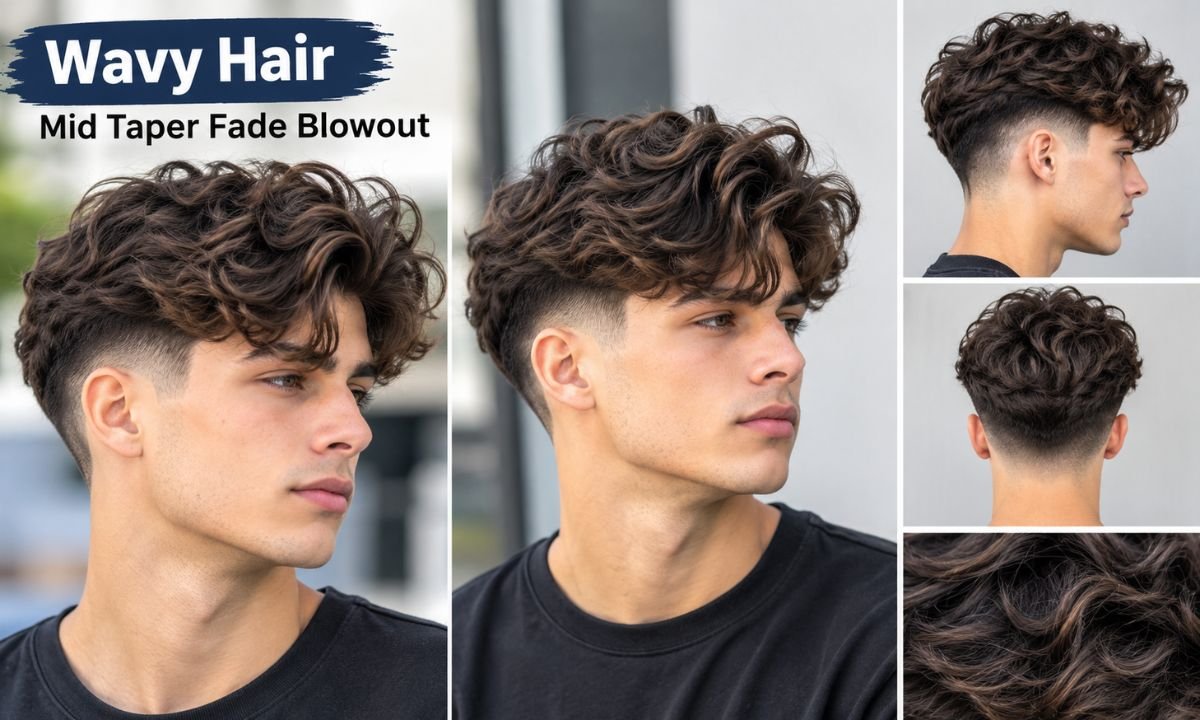
Wavy hair is the sweet spot for this cut. It already has bend and body, so the dryer adds height instead of creating it. You’ll often get the most natural result here.
The challenge is frizz. If you rough-dry wavy hair on high heat, it can turn puffy fast. Use medium heat and keep the nozzle moving.
A light cream or texturizing paste keeps the waves soft instead of crunchy. Wavy guys often look best when the top is slightly messy, so don’t over-polish it.
Curly hair
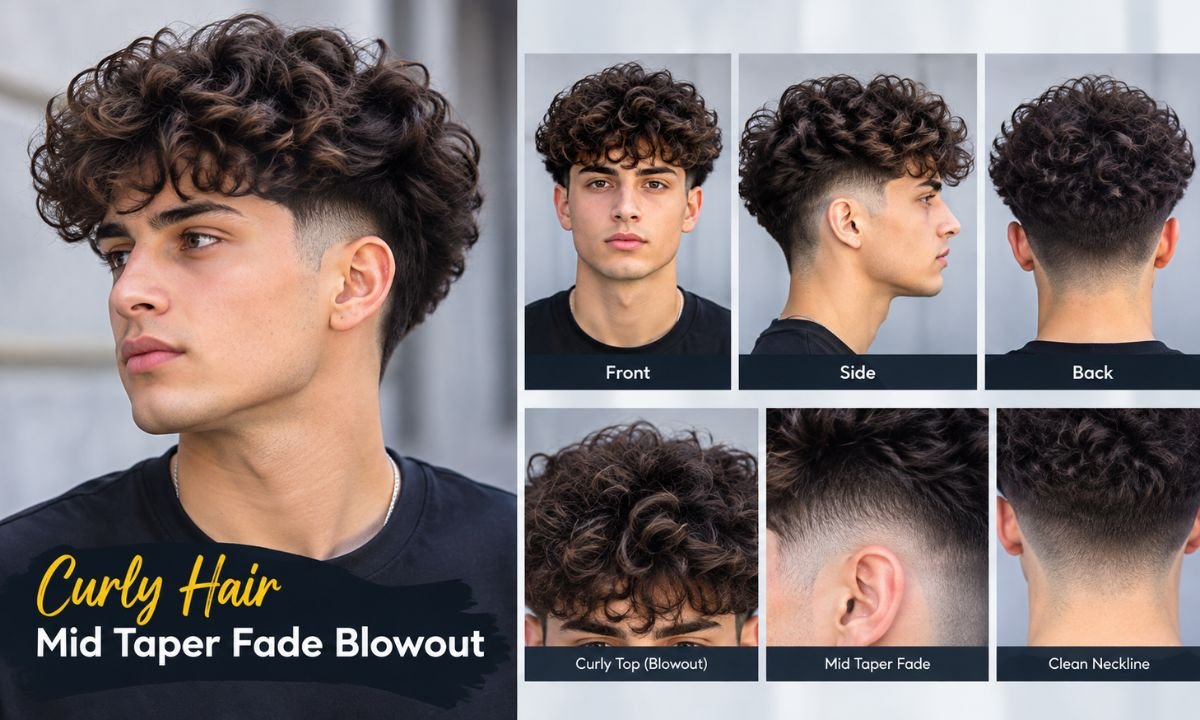
Curly hair has natural volume, so the blowout works differently. You may use a diffuser instead of a nozzle, or dry the curls on low heat to keep them defined and bouncy. The goal is shape, not straightening.
Moisture matters more here. A leave-in conditioner or curl cream before drying prevents the dry, fuzzy look. Your barber can also shape the top so curls sit in an even crown.
One tip: tell your barber if you want curls to stay defined or look fluffier. Those are two different finishes. Good communication saves you from a surprise.
Coily hair
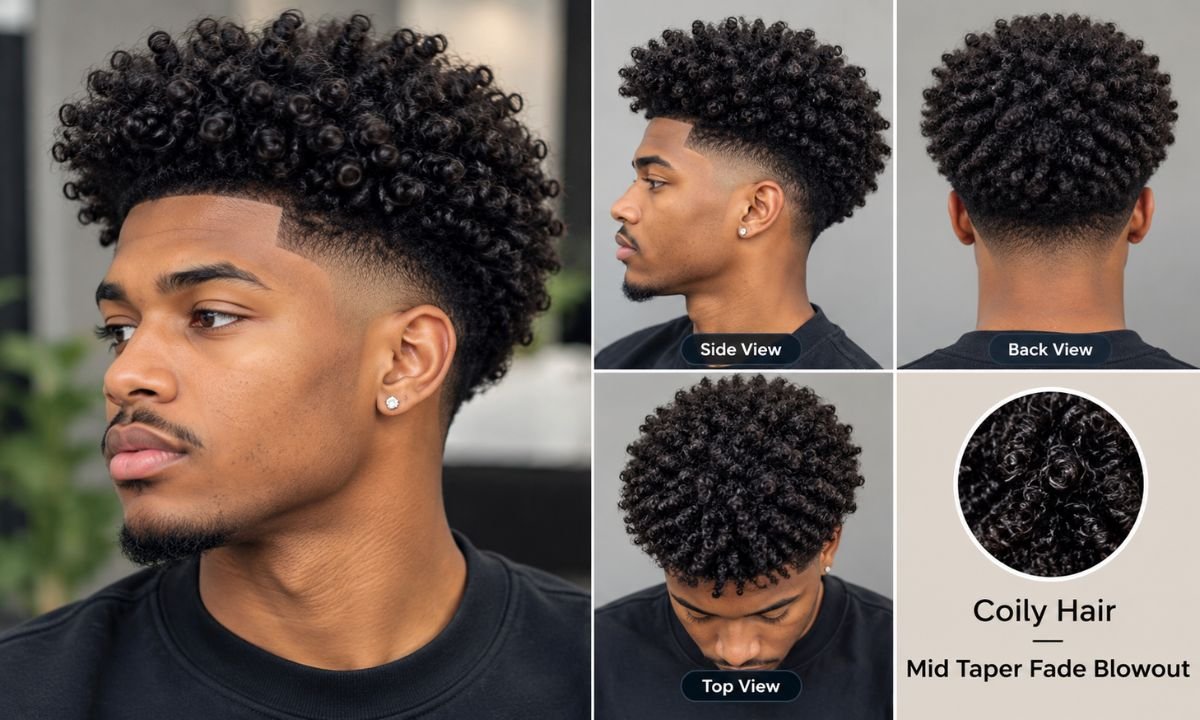
Coily hair shrinks a lot when it dries, sometimes by 50 percent or more. A true blowout stretches the hair so it looks longer and fuller. You usually need a comb attachment, low to medium heat, and a lot of patience.
Many barbers use a pick to lift the top after drying. The cut often keeps a shorter top, around 2 to 5 inches, so it stays even and easy to manage. A mid taper then frames it with sharp, clean sides.
Protect your hair here. Use a heat protectant every time, and don’t skip conditioning. Coily hair breaks easily when dry, so health comes first.
How hair thickness changes the plan
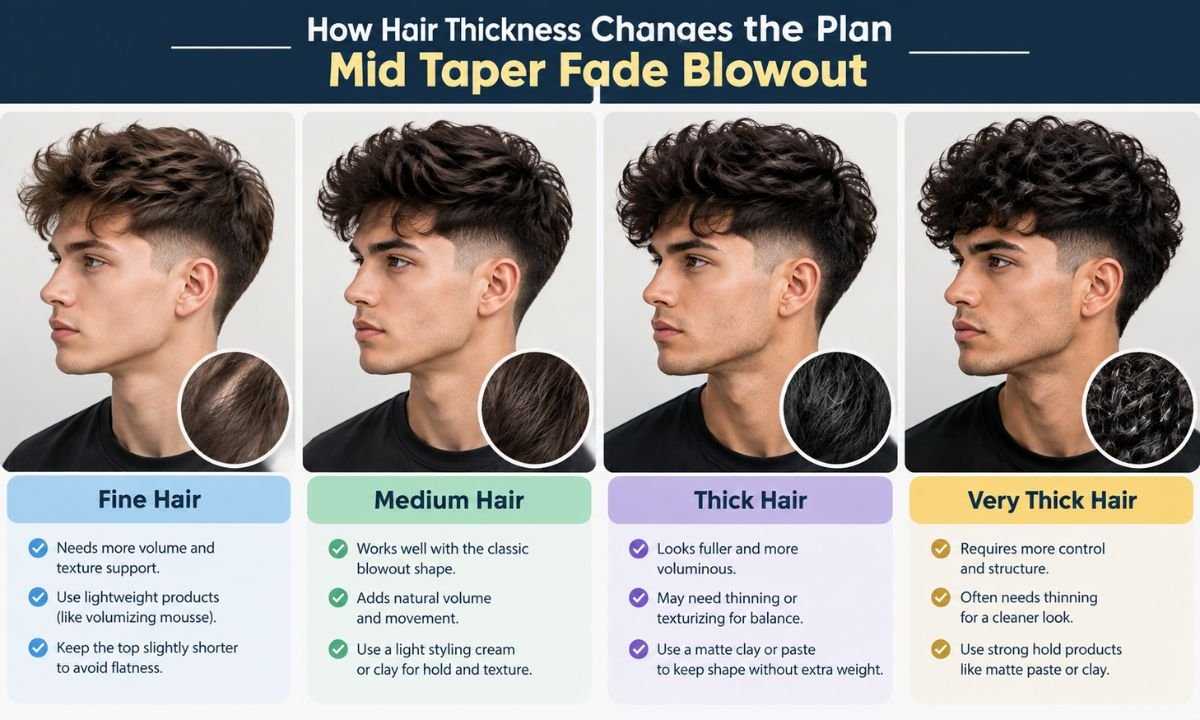
Thickness is different from density, and it matters. Fine strands are thin individually and often go flat. Coarse strands are wider and tend to stand up on their own.
Fine hair benefits from a volumizing mousse or powder at the roots. Coarse hair may need thinning shears so the top doesn’t look like a helmet. Your barber can feel the difference in about ten seconds.
If you’re not sure which one you have, roll a single strand between your fingers. If you barely feel it, it’s fine. If it feels wiry, it’s coarse.
Does your face shape matter?
It does, though less than people think. The taper and top height change how your face looks. A barber can use that to balance your features.
Round faces look longer with more height on top and tighter sides. Square faces handle almost any version. Long faces look better with a bit less height and more side fullness. Oval faces can wear nearly anything.
Don’t let this stop you from trying the cut. Treat it as a starting point, then adjust after you see yourself in the mirror.
Can thinning hair or a receding hairline pull it off?
Yes, with smart choices. A blowout adds visual density, which makes thin areas look fuller. A mid taper also keeps the sides neat, so the top gets the attention.
Choose a shorter top, around 2 to 3 inches, and avoid very high contrast fades. Brush the hair forward and slightly up to soften a receding hairline. Fibers or volumizing powder can help at the temples.
Avoid heavy products that clump the hair. Clumps reveal gaps. Light, matte products work better.
Do density, cowlicks, and styling time matter?
All three matter. Hair density decides how much hair sits per square inch. High density gives you fullness, but it also adds weight and drying time.
Cowlicks are small growth swirls, usually at the crown or front hairline. They push hair in odd directions. A skilled barber leaves a bit more length there so the hair lies down instead of fighting the style.
Styling time is the practical piece. Plan on 5 to 10 minutes each morning. If you want a five-minute routine, ask for a softer, messier version with less shaping.
Mid, low, or high: which blowout taper should you choose?
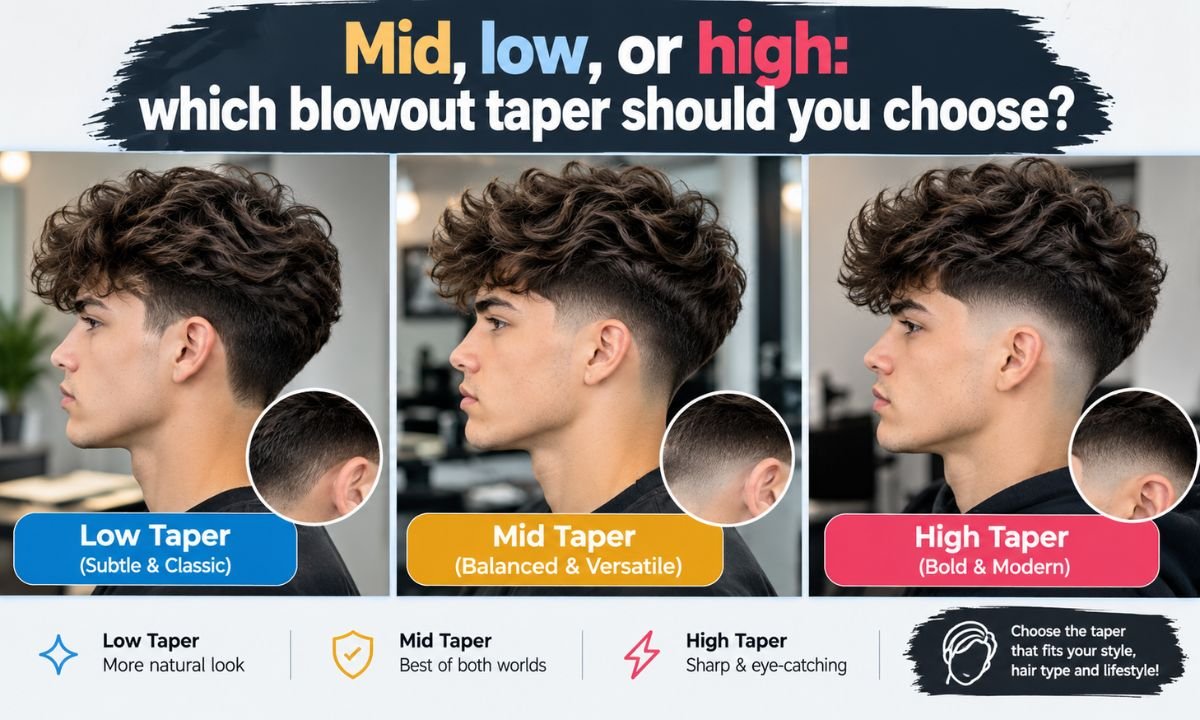
The only real difference is where the taper starts. A low taper begins near the ear and neckline. A mid taper starts at the temple. A high taper climbs higher, close to the top of the head.
Mid is the safest pick if you’re unsure. It balances neatness and length, and it works for office jobs and casual weekends. It also grows out gracefully.
Here’s how they compare.
| Taper | Where it starts | Best for | Vibe |
| Low | Just above ear and neckline | Conservative workplaces, longer hair | Subtle and soft |
| Mid | Around the temples | Most guys, most hair types | Balanced and versatile |
| High | Near the upper side of the head | Strong contrast, bold looks | Sharp and dramatic |
If you want your blowout to stand out, go higher. If you want it to look natural, go lower. A mid taper hits the middle ground, which explains its popularity.
How do you ask your barber for a mid taper fade blowout?
Walking in with the right words saves you from a bad haircut. Barbers hear a hundred requests daily, and vague ones lead to guesswork. Be clear, and you’ll get closer to what you picture.
Don’t just say “give me a fade.” That could mean five different cuts. Describe the side length, the top length, and the finish you want.
Honestly, a good barber loves details. It tells them you care, and it gives them something to work with.
What to tell your barber before the clippers start
Start with the key phrase: “I’d like a mid taper fade with a blowout on top.” Then add specifics. Say how short you want the sides, how long you want the top, and whether you like a skin or a soft taper at the neckline.
Here’s a simple script you can borrow:
- “Mid taper starting around my temple, #1 at the bottom, blending to a #3.”
- “Leave 3 to 4 inches on top with some layers so I can blow-dry it up.”
- “Keep the neckline natural, not squared off.”
- “I’ve got a cowlick at the crown, so please leave it a bit longer.”
Mention your routine too. Tell them if you’ll style it daily or only on weekends. That changes how much texture they cut in.
What reference photos should you bring?
Bring two to four photos, not twenty. Pick images of real hair that matches your texture. A photo of straight hair won’t help much if yours is curly.
Include at least one front view, one side view, and one of the styled finish. Photos of the back help too, since the neckline shape matters. If you can, show one example of what you don’t want.
Screenshots from your phone work fine. Just make sure the lighting is clear and the hair is the main focus.
How do you style a mid taper fade blowout at home?
You don’t need salon skills. You need the right order of steps and about ten minutes. Once you get the rhythm, it’ll feel automatic.
Think of styling as three layers. First you prep the hair. Then you dry it with direction. Finally you lock in the shape with a light product.
Don’t stress about perfection. The best blowouts look a bit lived in.
The step-by-step blowout routine
Here’s a routine that works for most hair types:
- Start with damp hair. Towel dry until it’s no longer dripping. Soaking wet hair takes forever to dry.
- Apply a heat protectant. Spray or work it through evenly. This step cuts down on damage.
- Add a pre-styler. Use sea salt spray or volumizing mousse for body. A small amount goes a long way.
- Rough dry on medium heat. Push the hair up and back with your fingers. Keep the dryer moving so you don’t scorch one spot.
- Use the nozzle for shape. Point the airflow downward along the hair shaft to cut frizz. Lift the roots with a vent brush or comb as you go.
- Finish with cool air. A cold blast sets the shape. It’s a small trick with a big payoff.
- Add a finishing product. Use a matte clay or light paste for texture. Rub it between your palms first, then work it through.
Total time is usually 8 to 10 minutes. Once you’ve done it a few times, you’ll speed up.
How styling changes by hair texture
Straight hair needs root lift and a light hold. Use a brush and aim the dryer upward at the front. A bit of texture spray finishes the job.
Wavy hair likes less brushing and more scrunching. Dry it with your hands, keep the heat moderate, and finish with a cream. That keeps the waves from turning into frizz.
Curly hair does best with a diffuser and gentle handling. Coily hair needs stretching, so use a comb attachment on low heat and finish with a pick. Whatever your texture, moisturize first.
What goes wrong with a blowout taper, and how to avoid it
Even a great haircut can fall apart at home. Most problems come from a handful of habits. The good news is that each one is fixable.
Let’s look at the usual suspects and how to deal with them. Spotting the problem is half the battle.
You can also take this list to your barber. Pointing at the issue helps them adjust the cut next time.
Why a blowout looks flat, puffy, or too heavy
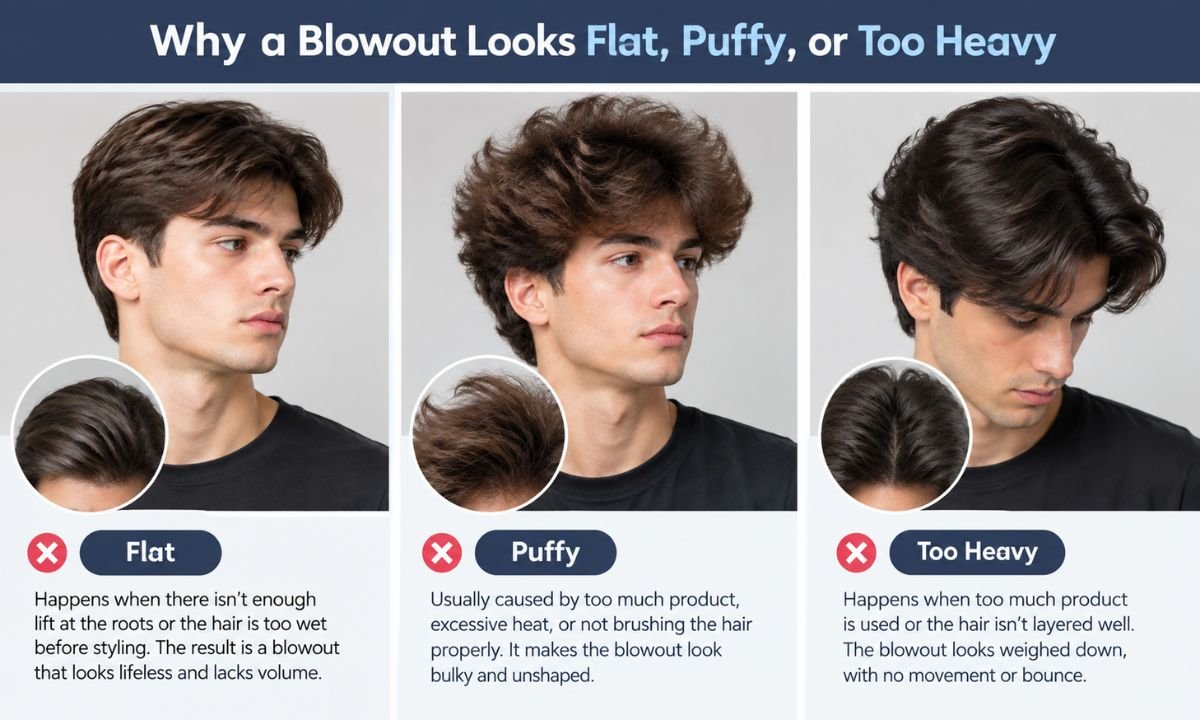
Flat: Usually caused by not enough lift at the roots or too much product. Dry the roots upward first, and use a lighter hold. Fine hair also needs a volumizing product to stand up.
Puffy: This comes from frizz, over-drying, or the wrong cut. Lower the heat, add moisture, and ask your barber to remove bulk from the sides of the top. A touch of cream tames the fluff.
Too heavy: Thick hair with no layering looks boxy. Ask for thinning or texturizing so the top moves. Skip heavy pomades, since they weigh everything down.
Other common errors:
- Styling hair that’s too wet or too dry
- Using high heat without protection
- Skipping the cool shot at the end
- Overloading on product
Can regular blow-drying damage your hair?
It can, if you do it carelessly. High heat strips moisture and weakens the hair cuticle. Over time, you may see split ends, dullness, and breakage.
You can lower the risk. Use medium heat, hold the dryer a few inches from your hair, and always add a heat protectant. Letting your hair air-dry about 70 percent first also cuts exposure.
If you blow-dry daily, add a weekly deep conditioner. Healthy hair holds a style longer, so it pays off twice.
How often does a mid taper fade blowout need a refresh?
Most people need a touch-up every 2 to 3 weeks. The taper loses its clean gradient first. Once the sides grow out, the contrast between top and sides starts to blur.
If you like a sharp look, go every two weeks. If you prefer softer, lived-in edges, three to four weeks works. Longer than that, and the shape starts to look shaggy.
Ask your barber for a quick cleanup between full cuts. Many shops offer neckline and sideburn tidy-ups for less money. It keeps the cut looking fresh without a full reset.
Top length matters too. You can usually go 6 to 8 weeks between trims on top if you’re growing it out. Just keep the taper maintained.
Mid taper fade blowout variations worth considering
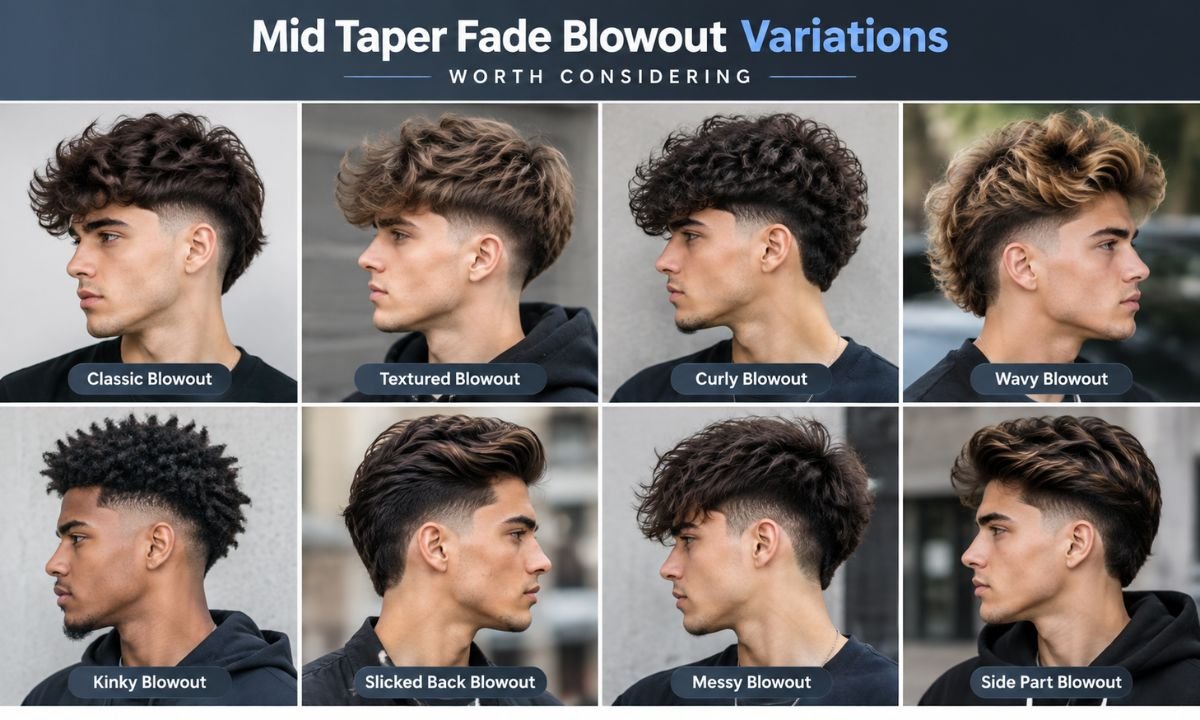
The base cut is flexible, and a few variations have taken off lately. Each one suits a different texture or personality. Pick based on your hair and your mood.
Here are six worth knowing. Show a few of them to your barber and see which one clicks.
Classic mid taper blowout
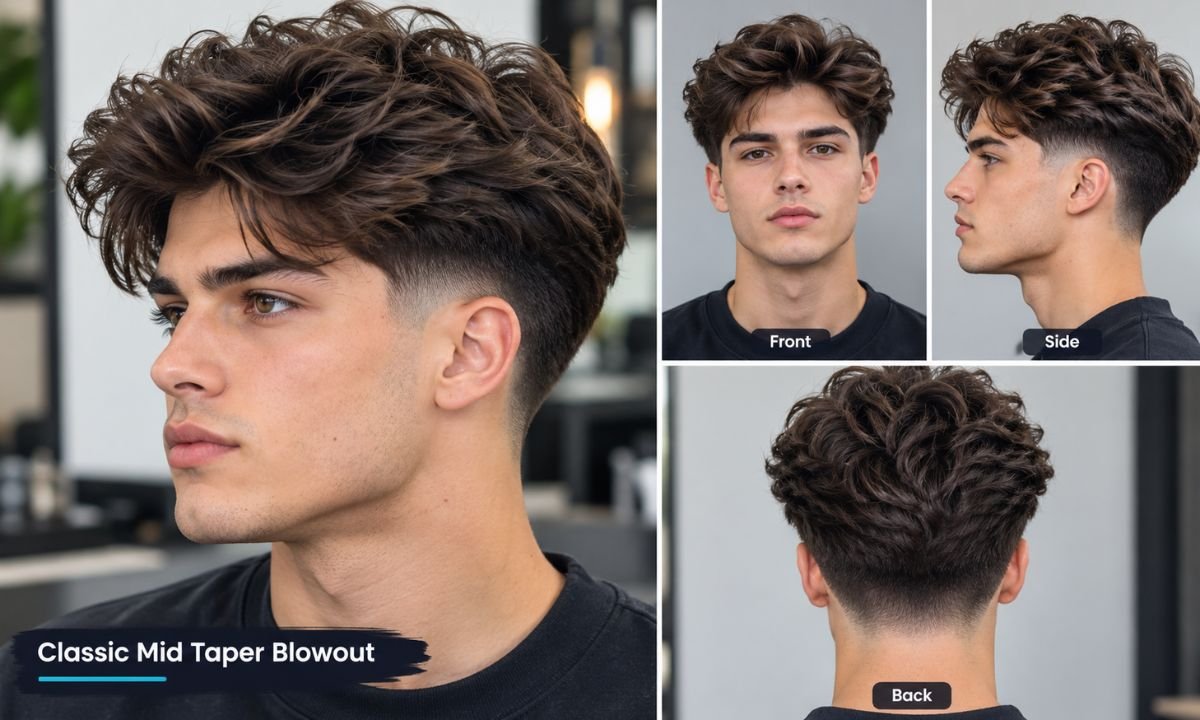
This is the standard version. The sides taper cleanly, and the top sweeps up and slightly back. It looks polished and works almost anywhere.
Use medium hold and a bit of shine if you want it formal. Skip the shine for a more relaxed vibe. It’s the safe choice and rarely a bad one.
Mid taper blowout with a textured fringe
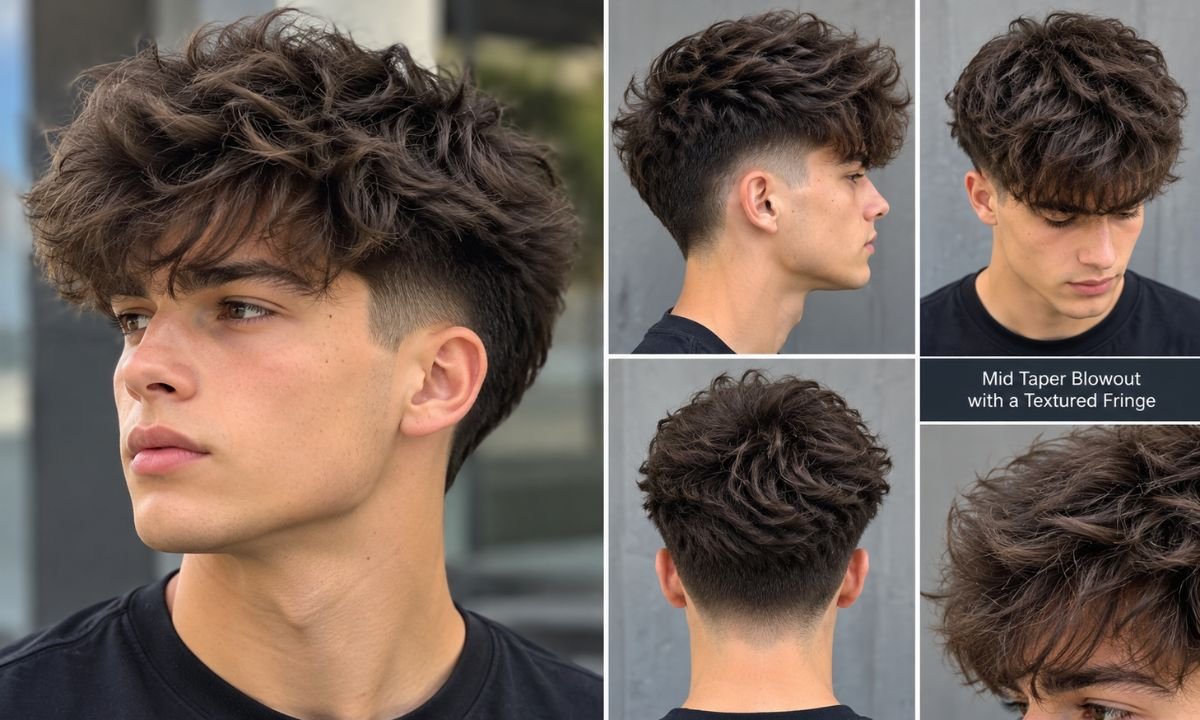
Here the front falls forward in a choppy fringe instead of sweeping back. It gives a younger, edgier feel. It also helps cover a high forehead.
Ask your barber for layered texture in the fringe. Style with a sea salt spray and a little paste. The result looks tousled on purpose.
Mid taper blowout for wavy hair
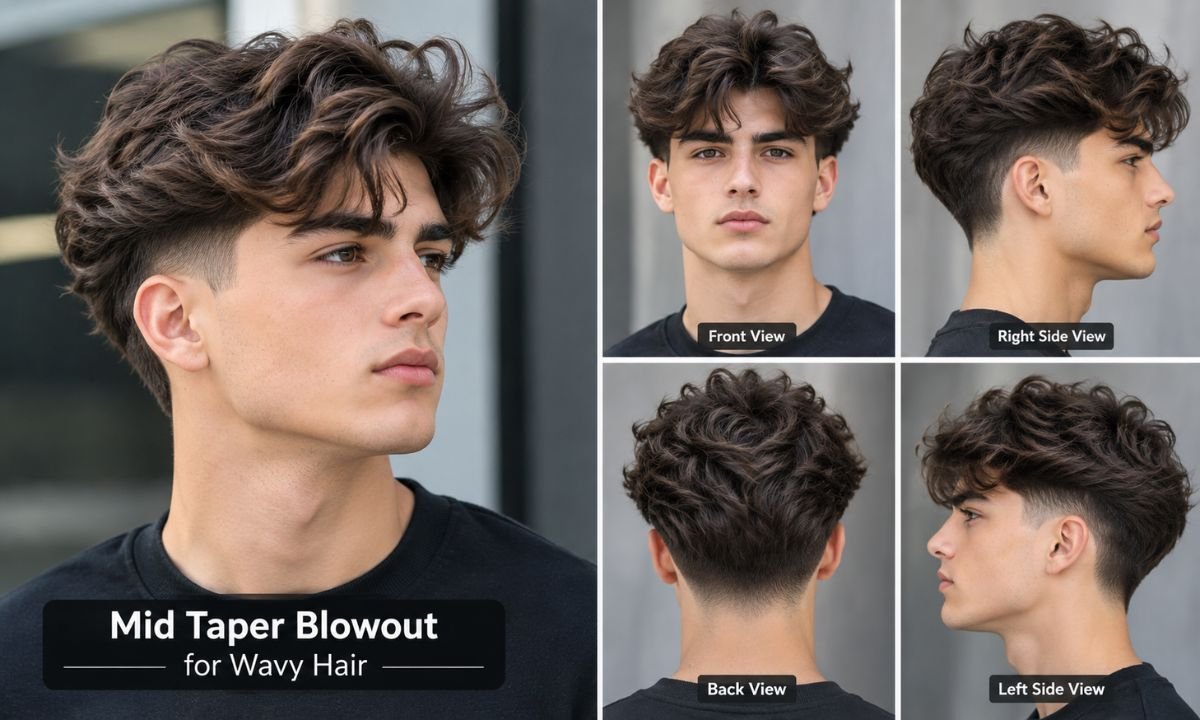
This one leans into natural movement. The top keeps its waves and gets lifted at the roots. It looks soft and effortlessly stylish.
Skip the brush and use your fingers. Finish with a curl or wave cream. Expect a relaxed, surfer-style finish.
Mid taper blowout for curly and coily hair
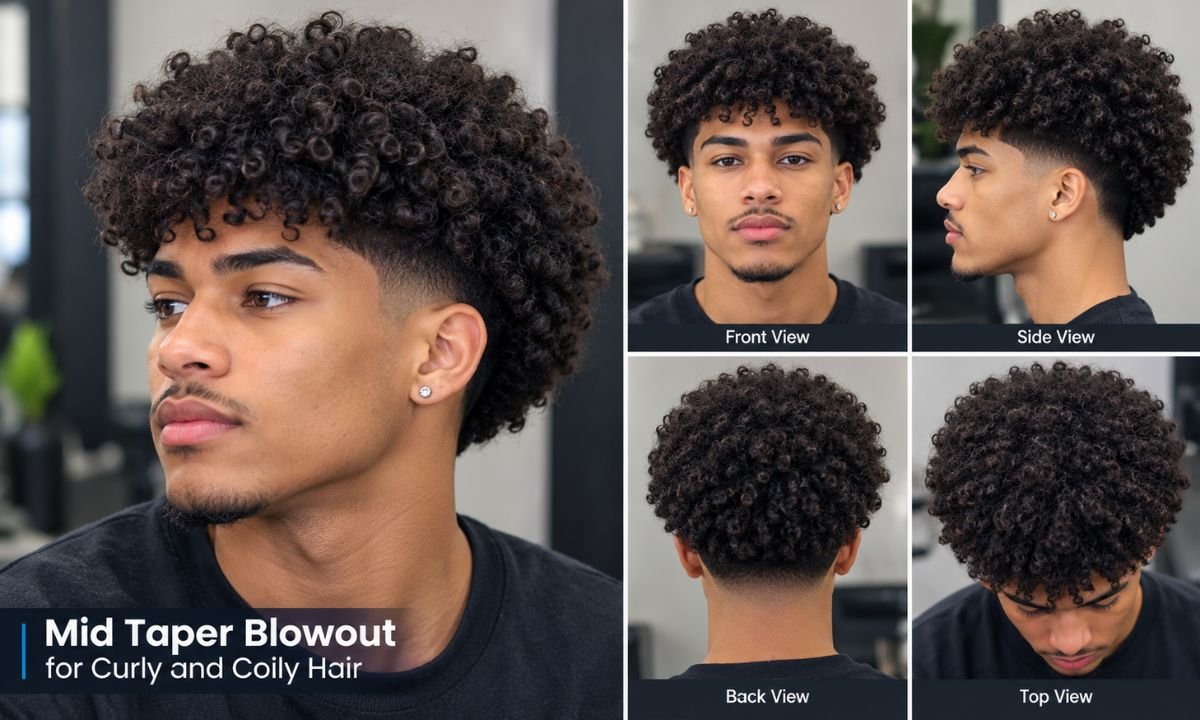
For curls, the top stays defined and rounded, with a clean taper underneath. The contrast makes the curls pop. For coily hair, stretching creates a fuller, sculpted shape.
Moisture is the secret. Hydrated curls look healthy and hold their form. Add a line-up at the front for extra sharpness.
Mid taper blowout for straight hair
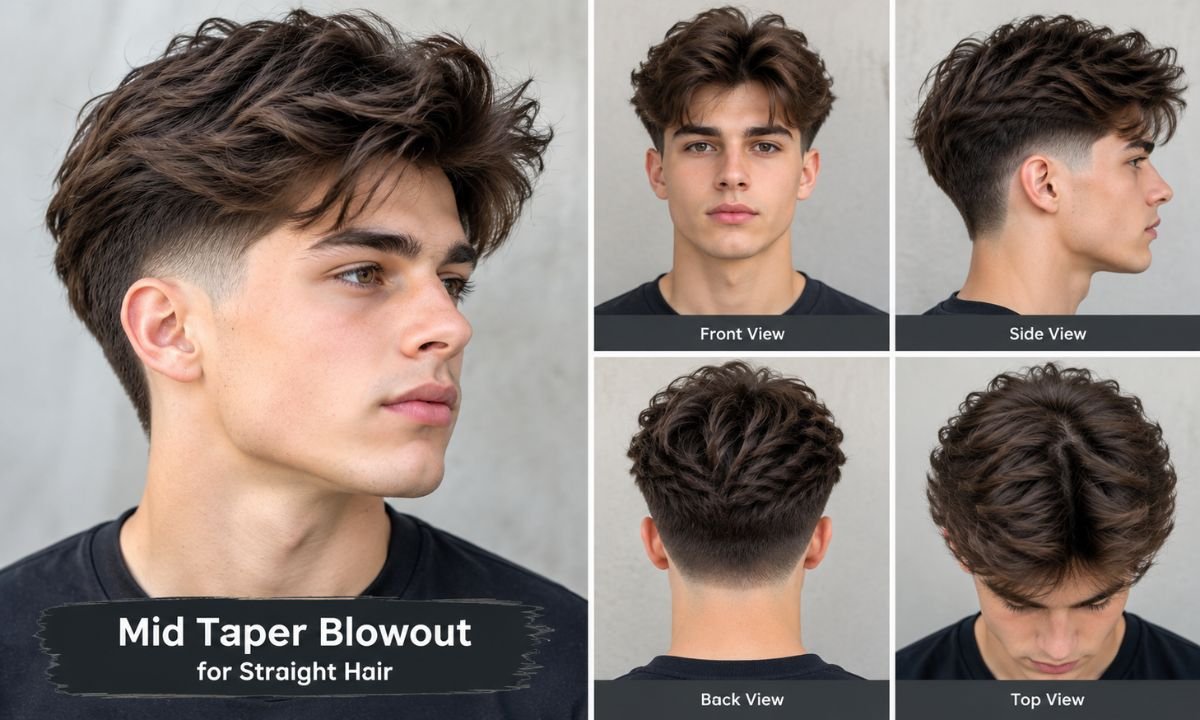
Straight hair benefits from layers and root volume. The result is a smooth, slightly lifted top with clean sides. It looks sleek and modern.
Use a lightweight paste and avoid heavy gel. Too much weight flattens the whole look. A bit of dry texture spray at the end gives it grip.
Fluffy or messy mid taper blowout
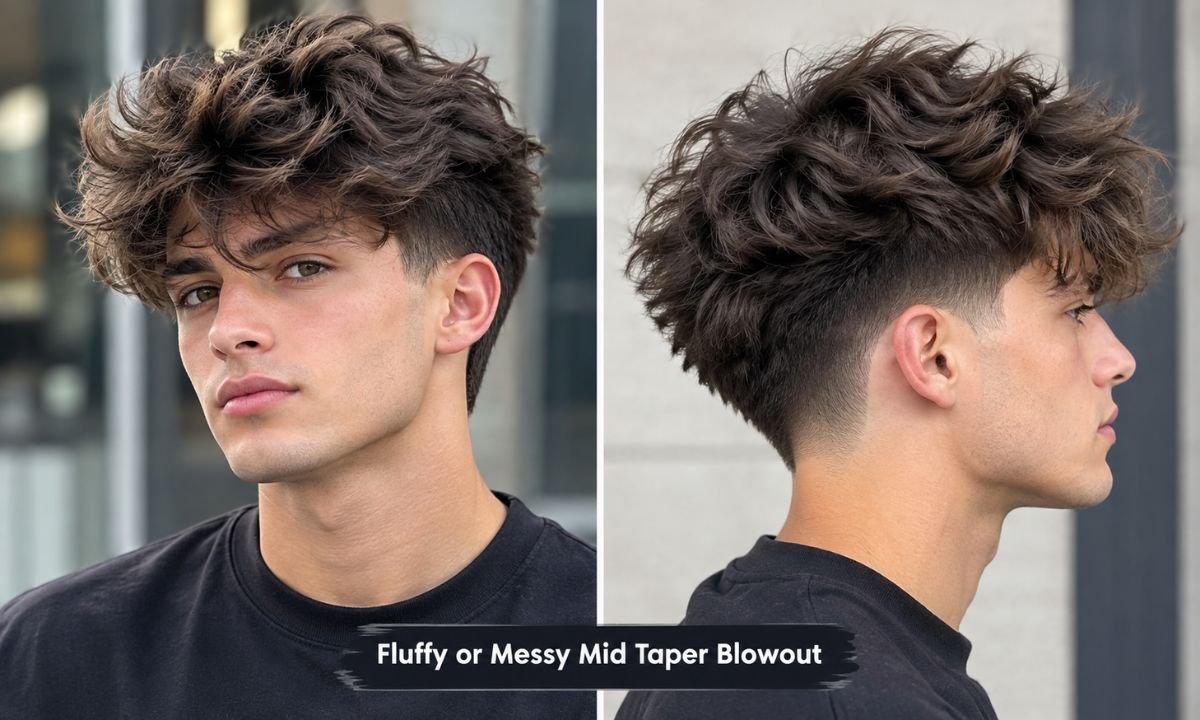
This version is big, airy, and a little undone. It’s all about natural fullness and movement. It’s also the most forgiving, since mistakes just look like style.
Skip the polish and use a sea salt spray with light clay. Dry it with your fingers and don’t comb it back neatly. Messy is the goal here.
Mid taper fade blowout vs similar haircuts
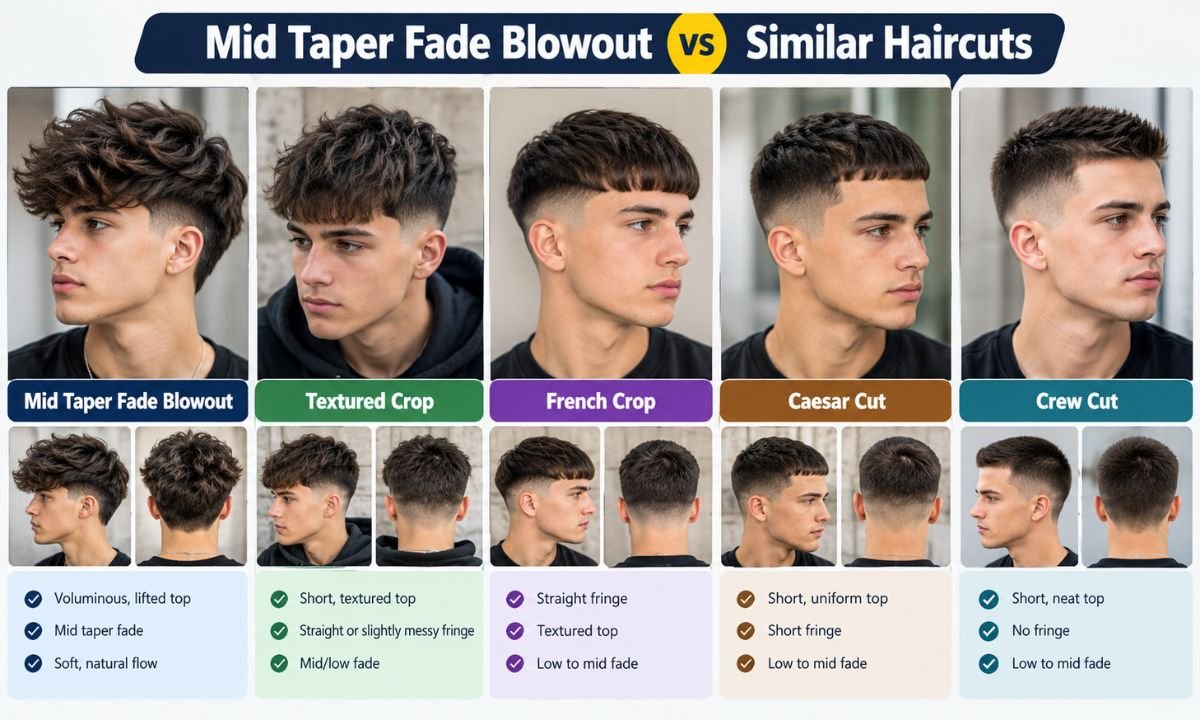
People mix up these cuts all the time. They share DNA, but the details differ. Knowing the difference helps you ask for the right one.
| Haircut | Sides | Top | Main difference |
| Mid taper fade blowout | Gradual taper from the temples | Blow-dried for volume | Heat-styled lift and height |
| Mid skin fade | Fades down to bare skin | Varies | Higher contrast, less hair at the bottom |
| Low taper fade | Starts near ear and neckline | Varies | More conservative |
| Textured crop | Short, often faded | Short and choppy | Shorter top, no blow-dry needed |
| Quiff | Tapered or faded | Swept up and back | Needs more length and styling hold |
The quiff looks closest to a blowout. The main difference is that a quiff relies on product for hold, while a blowout relies on airflow and shape. Both can look great.
If you want something lower maintenance, a textured crop might suit you better. If you want more volume, the blowout wins.
What to do before your barber appointment
A little prep makes a big difference. Walk in with clean hair, and your barber can see your natural texture and growth patterns. Skip heavy product the day before.
Decide what you want to change. Do you need more volume, a cleaner neckline, or less bulk? Writing it down helps if you tend to forget in the chair.
Bring your photos and a clear idea of your daily routine. If you have a special event coming up, book a week early. That gives the cut time to settle.
What’s trending in 2026 for the mid taper blowout
A few styles are rising this year. Softer tapers are replacing harsh skin fades. People want a clean look that doesn’t scream “fresh cut.”
Longer, fluffier tops are also popular, often paired with a subtle taper. Natural color is in, though some people add subtle highlights for dimension. Textured, lived-in styling beats stiff, glossy finishes.
Beards are part of the picture too. A blended beard taper that connects to the sideburns completes the look. If you grow a beard, ask your barber to match the fade.
Best products and tools for a mid taper blowout
You don’t need a full shelf of products. A few good ones cover almost everything. Choose based on your hair type, not on hype.
Here’s a simple starter kit:
- Heat protectant spray to shield hair from the dryer
- Sea salt spray or volumizing mousse for body
- Matte clay or paste for texture and hold
- A dryer with a concentrator nozzle for control
- A vent brush or wide-tooth comb for lift
- A pick if you have curly or coily hair
Spend your money on the dryer first. A decent one with adjustable heat settings is worth it. Cheap dryers run too hot and cause more damage.
For coily hair, add a leave-in conditioner. For fine hair, skip anything heavy. Keep it simple and adjust as you learn what your hair likes.
How much does a mid taper fade blowout cost?
Prices vary by city and shop. Most barbershops charge somewhere between $25 and $60 for the haircut. Higher-end salons may charge more, especially if they style the top with a full blow-dry.
Add tip, which is usually 15 to 20 percent. Maintenance visits for neckline cleanups often cost less. Budget for a visit every few weeks.
Don’t pick a barber on price alone. Look at their work, especially on your hair type. A great fade is worth a few extra dollars.
Frequently Asked Questions
What is the difference between a taper and a fade?
A taper leaves more hair and gets shorter gradually, mostly at the neckline and sideburns. A fade usually drops much shorter, sometimes to bare skin. A taper looks softer, while a fade looks sharper.
How long should my hair be for a mid taper fade blowout?
Aim for 3 to 5 inches on top. Shorter hair won’t lift enough to show off the blowout. Curly and coily hair can work with slightly shorter lengths because it stands up on its own.
Can I get this haircut with short hair?
You can try, but results may be limited. Very short hair won’t give you much volume. Grow the top out for a few weeks before you book.
Do I need a blow dryer every day?
Not always. You can air-dry and add a bit of product for a softer look. For the full blowout shape, a dryer helps, but a few times a week is fine.
Is the mid taper fade blowout good for thick hair?
Yes, if your barber thins the top. Thick hair carries a lot of weight, so layering and texturizing matter. Without that, it can look heavy and boxy.
Will this haircut work with a beard?
It works well. Ask for a beard fade that blends into your sideburns. That connection makes the whole style look intentional.
How can I make my blowout last longer?
Start with clean, damp hair and use a heat protectant. Finish with a cool blast of air and a light-hold product. Avoid touching it too much during the day.
Final Thoughts
The mid taper fade blowout works because it’s balanced. Clean sides give it structure, and the airy top gives it personality. It adapts to your hair type, your schedule, and your style.
The keys are simple. Pick the right taper height, talk clearly with your barber, and learn a quick routine at home. Take care of your hair health, and the cut will reward you.
So which version are you leaning toward? Drop your pick in the comments, and tell us what your barber said. Share this with a friend who’s stuck on what to ask for. And come back often, since trends change and this guide will keep evolving.
