

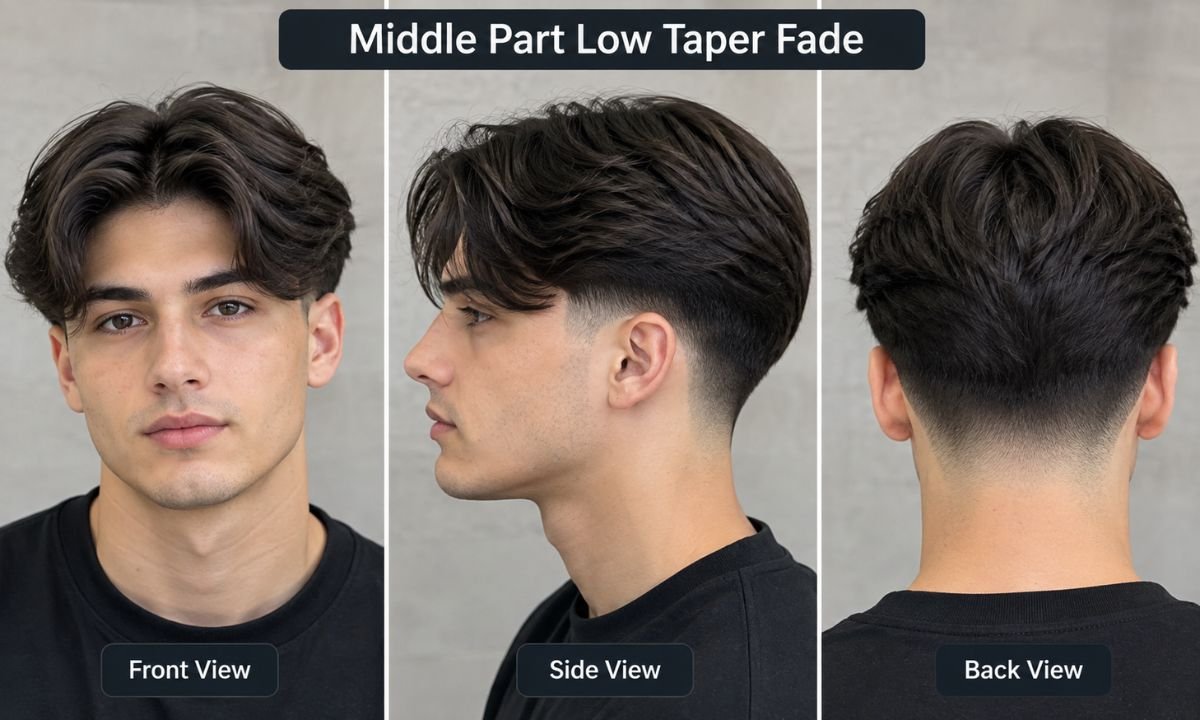
Wondering if a middle part low taper fade suits you? It probably does. It pairs a center-split top with sides that fade gently down near the ears and neckline. You get length up top and a tidy finish below.
You may worry that a middle part looks dated or won’t suit your face. Or you’re afraid your barber will cut it too short. Those worries are fair, and this guide answers each one.
You’ll learn what the cut is, who it flatters, and how to ask for it. We’ll also cover styling and upkeep. Grab a coffee and let’s get into it.
What is a middle part low taper fade?

A middle part low taper fade has two pieces. The first is a center part that splits your top hair evenly down the middle. The second is a low taper, where the sides and back shrink gradually in length. The shortening begins just above the ear and follows your natural hairline.
The word “taper” matters here. A taper is a subtle blend that leaves some length even at the shortest point. A skin fade goes down to bare skin. So this cut looks softer and more natural than a hard fade.
Picture a slope instead of a staircase. The hair moves from longer to shorter without a visible line. That’s why the cut reads clean but never harsh.
Why it’s popular in 2026
The center part came back with the 90s revival and never left. Gen Z grew up watching old films and music videos with that shaggy, split look. Now they wear it themselves, and it feels fresh again.
Social media also pushed it hard. Short videos show the before and after in seconds. A low taper looks sharp on camera from every angle.
There’s a practical reason too. The cut works in offices, gyms, and weddings. You can wear it messy on Saturday and polished on Monday. Few haircuts flex that well.
Best face shapes

Face shape decides how a center part sits on you. Oval faces get the easiest ride, since nearly any style works. Square and diamond faces also do well because the part softens strong angles. Heart-shaped faces look balanced when the fringe has a little weight.
Round faces need a small tweak. Add height at the roots and keep the sides tight. That lengthens the face and adds structure.
Oblong faces need care because a center part can stretch the look further. Keep the top slightly shorter and add some texture. Also skip a very flat, heavy fringe.
How it looks on straight, wavy, and curly hair

Hair texture changes the whole result. The same cut looks calm on one person and wild on another. Neither is wrong, but you should know what to expect.
Ask yourself how your hair behaves when it dries naturally. Does it fall flat, bend, or coil? Your answer tells you which style to chase.
Below, you’ll find how each hair type and density responds. Read your own section first, then skim the others for ideas.
Straight hair
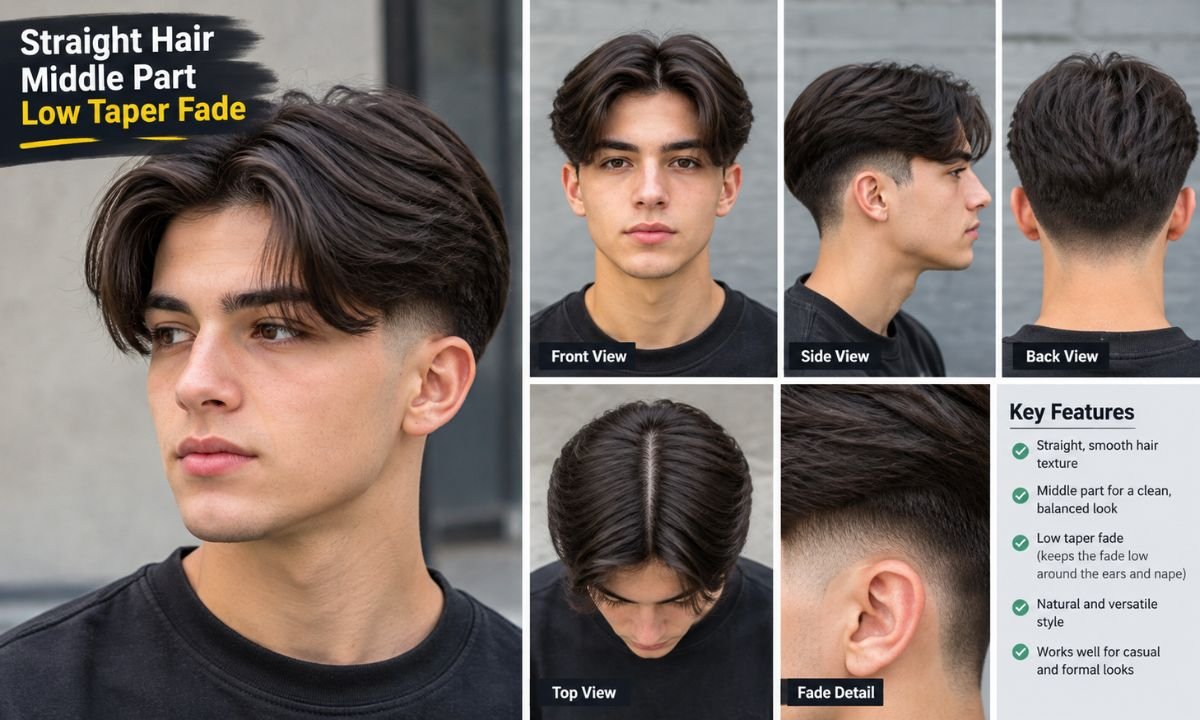
Straight hair gives the cleanest center part of all. The split stays sharp and the fringe falls like a curtain. It’s the classic look.
The catch is that straight strands can go flat. Add a little texture spray or light powder for lift. That keeps the part from looking stuck to your scalp.
Straight hair also shows every uneven line. Ask your barber for a crisp taper and check the mirror before you leave. Small mistakes stand out more here.
Wavy hair

Wavy hair is the sweet spot for this cut. It bends on its own and makes the part look relaxed. You get natural movement with almost no effort.
Wavy hair can frizz when humidity rises. A bit of sea salt spray or light cream calms it. Scrunch gently and let it air dry when you can.
Keep the top around three to four inches. That length lets the waves form into soft curtain bangs. Shorter than that, and they just puff out.
Curly hair

Curly hair adds volume and personality to the cut. The taper keeps the sides neat while the top does the talking. It’s a bold contrast, and it works.
Curls shrink when they dry, so cut them longer than you’d expect. A four-inch curl may look like two inches later. Tell your barber about that shrinkage.
The center part also looks less strict on curls. It forms a loose, wavy divide instead of a straight line. Many people love that softer effect.
Thick hair

Thick hair holds shape well but can feel heavy. Without thinning, the top can look like a helmet. Ask your barber to remove bulk with texturizing shears.
The taper helps here because it cuts weight from the sides. You’ll get a balanced outline rather than a mushroom shape. That’s a win for thick hair.
Use a matte clay or paste for control. Work it through damp hair and blow dry with your fingers. The part will stay in place all day.
Fine or thin hair

Fine hair needs a smarter plan. Too much length makes the part look see-through. Keep the top a little shorter, around two to three inches.
Volume products help a lot. A light mousse or root lift spray gives body without weight. Avoid heavy pomades since they clump fine strands.
A low taper also helps fine hair. The neat sides make the top look fuller by comparison. It’s a small visual trick that works.
The best middle part low taper fade short hair

Short hair can carry a center part more easily than you think. You just need at least two inches on top to make the split visible. Under that, the part disappears.
A short version keeps the fringe above the eyebrows. It looks clean and takes about five minutes to style. Busy people love it for that reason.
Ask for a textured top with a low taper fade on the sides. Then dry it forward and split it with a comb. A dab of paste finishes the job.
Middle part flow with Low taper Fade

The flow is the longer, ear-grazing style that swings with movement. It’s relaxed, a bit dreamy, and very popular. Think surfer meets city guy.
Flow needs patience. Most people wait several months to reach the right length. During that time, the taper keeps the sides neat so you don’t look messy.
Style it with a sea salt spray and a blow dryer. Point the air down and back while you part it. Let the ends fall naturally over your ears.
The best middle part low taper fade curly hair

Curly hair paired with a low taper gives a strong, confident silhouette. The curls sit on top like a crown. The tight sides make them stand out even more.
Moisture matters most here. Use a curl cream on damp hair and skip brushing once dry. Brushing turns curls into a puffy cloud.
Let the part form on its own. You can define it with a finger, but don’t force a straight line. A loose divide looks far more natural on curls.
Choosing the right top length
Top length changes the whole personality of the cut. Two inches feels crisp and modern. Four inches feels soft and casual. Six inches or more moves into flow territory.
Hair grows about half an inch each month. So if you want longer hair, plan several months of growth. A short trim every six weeks keeps the shape from falling apart.
Consider your daily routine before you pick. If you hate styling, go shorter. If you enjoy a longer routine, grow it out and play.
How to ask your barber
Barbers work better when you show, not just tell. Bring two or three photos of the exact look you want. Pictures beat vague words every time.
Then use clear language. Say, “I’d like a low taper fade with a center part and about three inches on top.” Mention the guard numbers if you know them, like a number one or two at the shortest point.
Also say what you don’t want. If you hate a bald finish, say so. If you want the neckline natural instead of squared off, mention it early.
Low taper vs mid taper fade

Both cuts blend from long to short. The real difference is where the blend begins. A low taper starts near the ear and neckline. A mid taper starts around the temple, halfway up the head.
The low option looks softer and more subtle. The mid option shows more contrast and feels bolder. Neither is better; they just suit different moods.
| Feature | Low Taper | Mid Taper |
| Starting point | Just above the ear | Around the temple |
| Look | Soft and natural | Sharper and bolder |
| Best for | Office and casual wear | Fashion-forward styles |
| Grow-out time | Slow and easy | A little faster to look messy |
Middle part vs side part

People often ask which split wins. The answer depends on your face and your mood. Each one changes how your features read.
A center part looks balanced and symmetrical. It works best on oval, square, and heart-shaped faces. It also gives that relaxed, retro feel you see everywhere now.
A side part looks more formal and structured. It adds asymmetry, which helps if your face is very round or very long. It’s also the safer pick for strict dress codes.
Not sure which one to choose? Try both at home before your appointment. Comb your dry hair each way and take a photo. Your camera roll will settle the debate fast.
Styling products that work
Great hair starts with the right product. You don’t need a full shelf, just two or three basics. Match them to your hair texture and desired finish.
- Matte clay: Gives strong hold with no shine. Good for thick or straight hair.
- Sea salt spray: Adds grip and a beachy feel. Good for wavy hair.
- Light mousse: Adds volume without weight. Good for fine hair.
- Curl cream: Defines and hydrates. Good for curly hair.
- Texture powder: Lifts roots in seconds. Good for flat straight hair.
Start with a pea-sized amount and add more if needed. Too much product makes hair look greasy fast. You can always add, but you can’t easily remove.
How to style it at home
Start with damp hair after a shower. Towel dry it gently so it stays slightly wet. Apply your prep product, like salt spray or mousse, from roots to ends.
Next, blow dry while you part the hair down the middle. Use your fingers or a wide comb to guide it. Point the dryer down to keep the fringe smooth.
Finish with a small amount of clay or cream. Rub it between your palms and run it through. Then shape the ends and check the part in the mirror.
Best tools for styling at home
Good tools save you money over time. You don’t need a bathroom full of gadgets. Four items cover almost everything.
- Wide-tooth comb: Creates a straight center part and detangles curls without pulling.
- Blow dryer with a nozzle: Focuses airflow so the fringe stays smooth.
- Diffuser attachment: Protects wavy and curly hair from frizz while drying.
- Small trimmer: Keeps the neckline neat between barber visits.
A tail comb also helps if you like a razor-straight split. Drag the tip down the middle of your scalp and the line appears. It takes ten seconds once you’ve practiced.
Clean your tools every week. Product buildup makes hair look dull and heavy. A quick rinse fixes that.
How often to maintain it
A taper looks best when it’s fresh. Most barbers suggest a visit every two to three weeks. After that, the blend starts to look grown out.
If you can’t book that often, stretch it to four weeks. The low taper grows out more gracefully than a skin fade. You’ll still look tidy for longer.
Between visits, keep the neckline clean with a small trimmer. Just don’t touch the fade line itself. Leave the blending to the pro.
Variations to try

Once you love the base cut, try a few tweaks. Each one changes the mood with small edits. Your barber can adjust them in minutes.
Below are six easy versions to experiment with. Pick one that matches your hair and lifestyle. You can switch later.
Classic

The classic version keeps the top neat and even. The part sits sharp and the sides stay tight. It’s ideal for work and formal events.
Use a light pomade for a clean shine. Comb it back into the part and let it settle. That gives a timeless, polished finish.
Ask for a straight, tidy fringe about two to three inches long. Keep the taper subtle. Simple wins here.
Textured
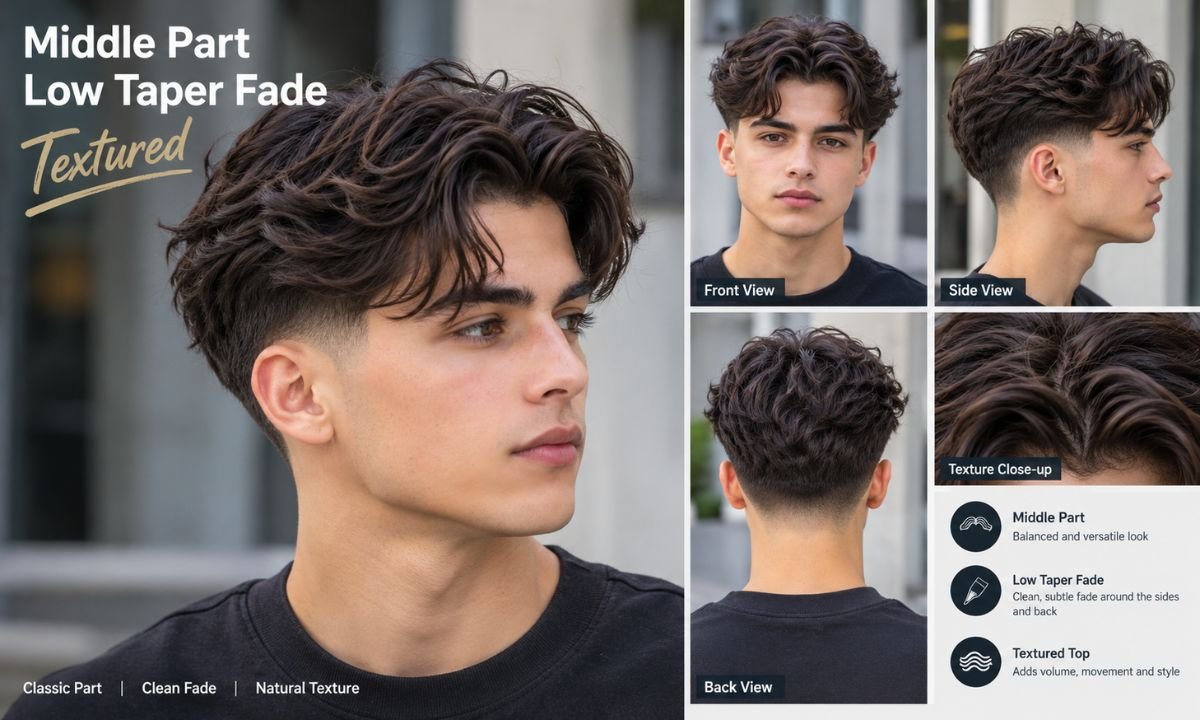
The textured style adds chopped layers on top. It looks messy on purpose, and that’s the charm. It hides cowlicks and thin spots well.
Your barber may use point cutting to build the texture. At home, add matte paste and scrunch it. Skip the comb for a rougher vibe.
This one suits most hair types, especially straight and fine hair. It adds movement where there’s none. Try it if your hair feels flat.
Curly top
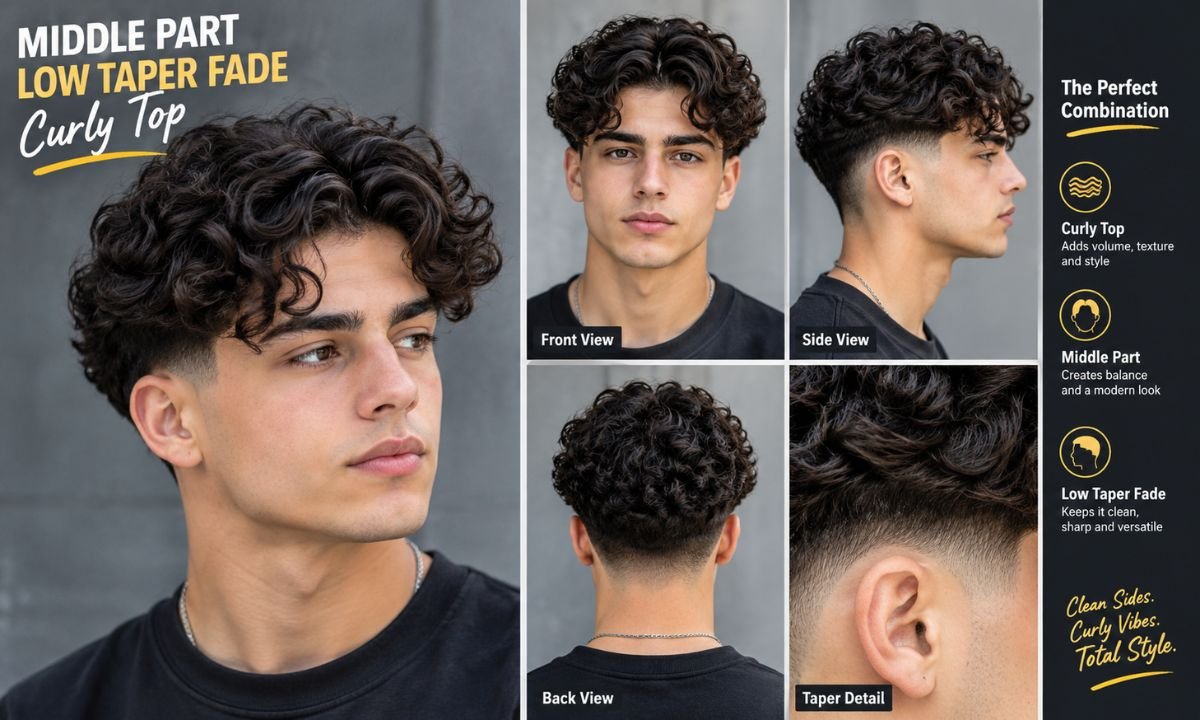
The curly top puts natural curls front and center. The center split becomes a loose divide. Combined with a tight taper, the contrast pops.
Keep your curls moisturized and defined. Use a diffuser when you blow dry. That prevents frizz and holds the shape.
Trim every four to six weeks to control shape. Curls can grow wide fast. Regular shaping keeps them balanced.
Wavy curtain
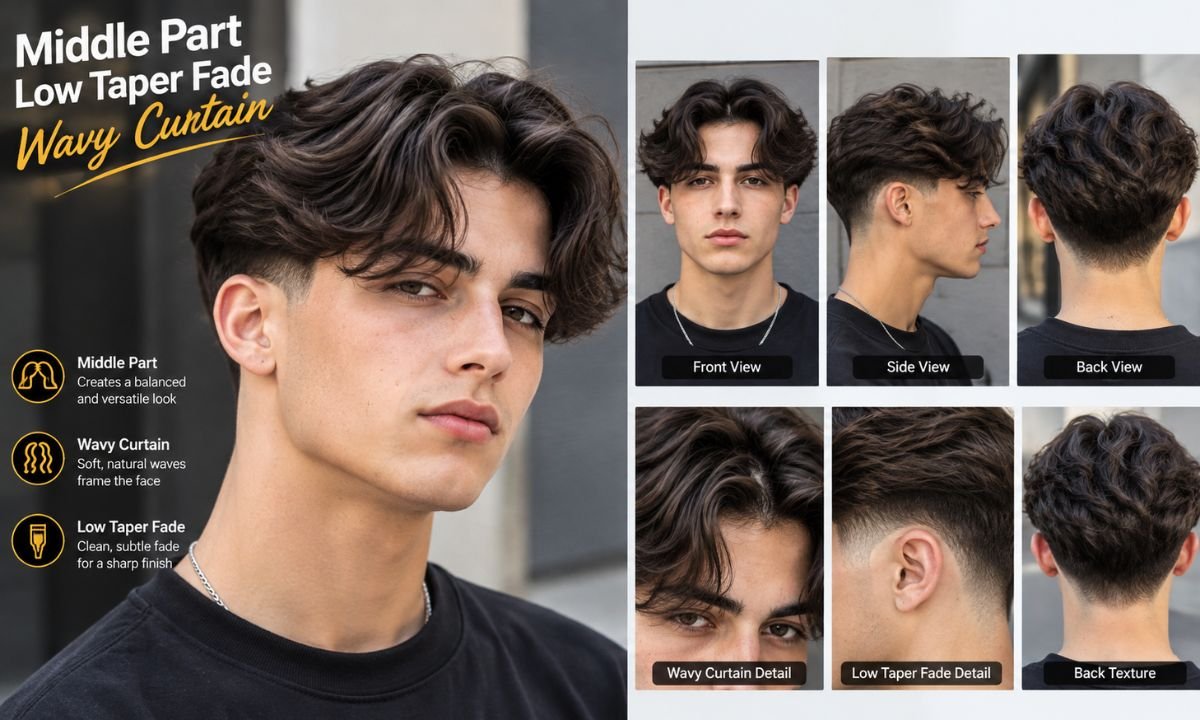
The wavy curtain leans into the curtain bangs trend. The hair falls on both sides of the part like drapes. It looks soft and romantic.
You need about four inches on top for this one. Style with sea salt spray and let it dry naturally. Avoid heavy gels.
It works nicely on oval and square faces. It frames the eyes and cheekbones. Many people say it feels effortless.
Longer fringe
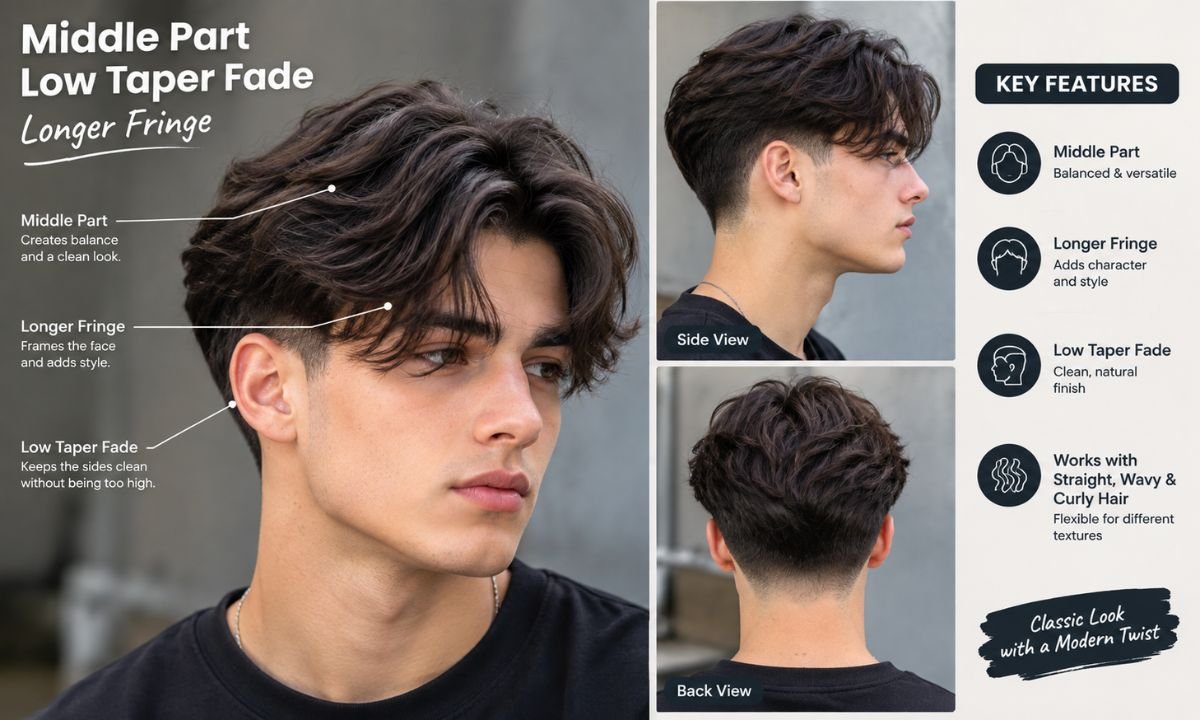
A longer fringe hangs near the eyebrows or even the cheekbones. It creates a moody, artistic feel. The taper keeps everything else neat.
You’ll tuck it behind your ears sometimes. That’s part of the fun. It gives you a few looks in one cut.
Just keep it healthy. Split ends show quickly in longer hair. A small trim now and then helps.
Subtle skin finish
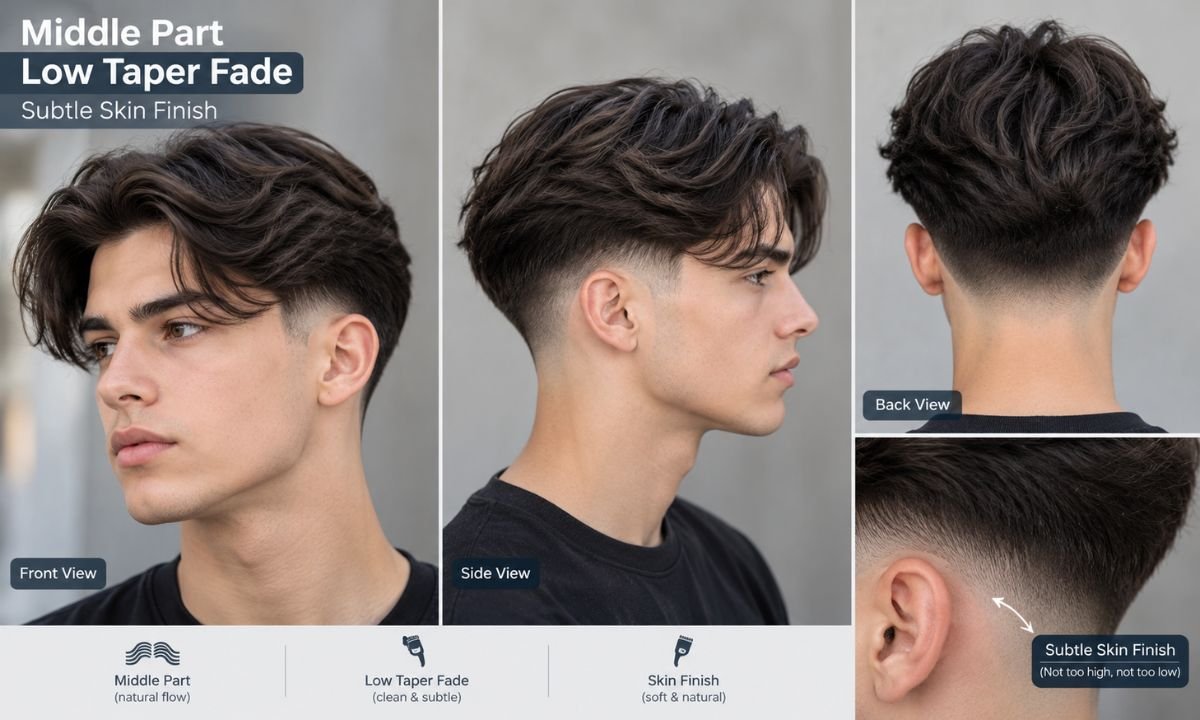
A subtle skin finish takes the taper close to the skin at the very bottom. It adds a sharp edge without a big contrast. Think of it as a whisper of a fade.
Barbers often use a foil shaver for this touch. It gives a clean, polished look around the ears and neck. It also makes the cut feel more modern.
Be aware it grows out quickly. Expect a visit every two weeks to keep it crisp. Some people love that routine, while others skip it.
Celebrity-inspired looks

You’ve seen this cut on actors, athletes, and musicians. Most of them wear a version of it with small personal tweaks. You don’t need their budget to copy the idea.
Start with the mood you like. A moody, longer fringe feels artistic and cinematic. A short, textured top feels sporty and clean. A wavy curtain feels soft and effortless.
Save two or three reference photos of people whose hair texture matches yours. A photo of straight hair won’t help if your hair curls. Matching texture keeps your expectations realistic.
Then tell your barber what you like about each photo. Maybe it’s the length, or the fade height, or the messy finish. Specific feedback beats “make me look like him” every time.
Common mistakes to avoid
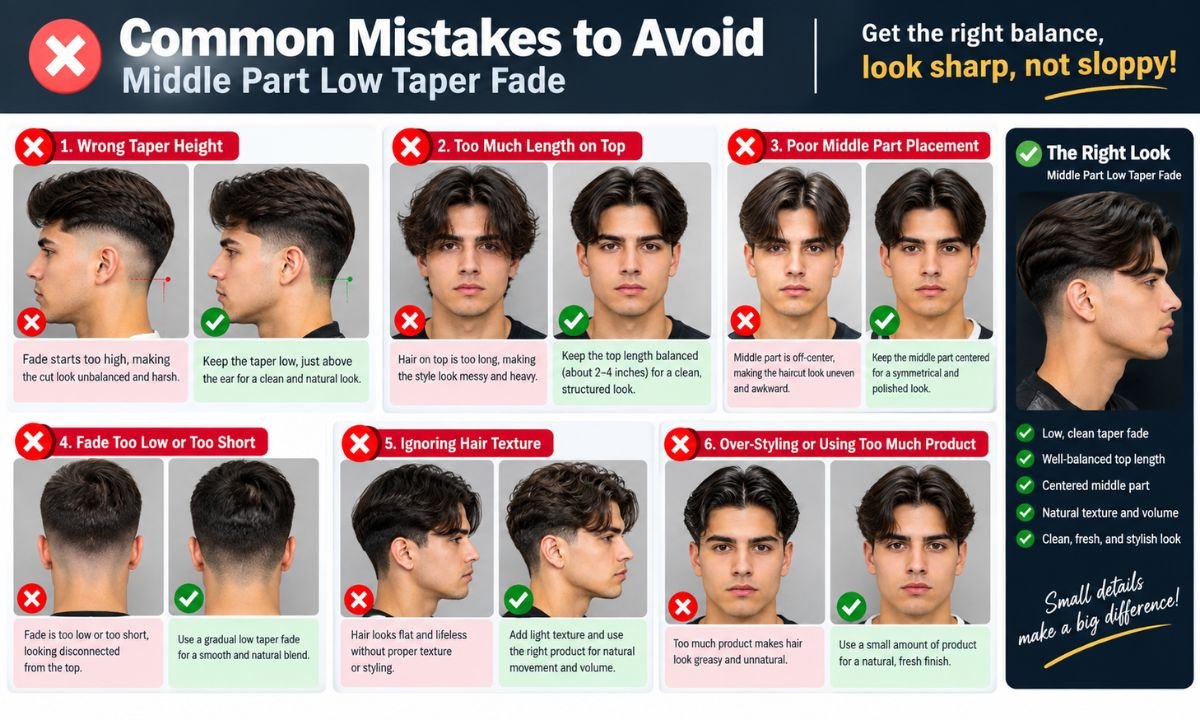
One big mistake is getting the part too far off center. A crooked split makes the face look uneven. Use a mirror or comb to find your true middle.
Another mistake is skipping product. Without any hold, the top falls flat and the part vanishes. A little clay or cream saves the day.
People also cut the top too short at the start. You can always trim more, but you can’t add length back. Start longer and adjust.
Hair care tips that keep the cut looking sharp
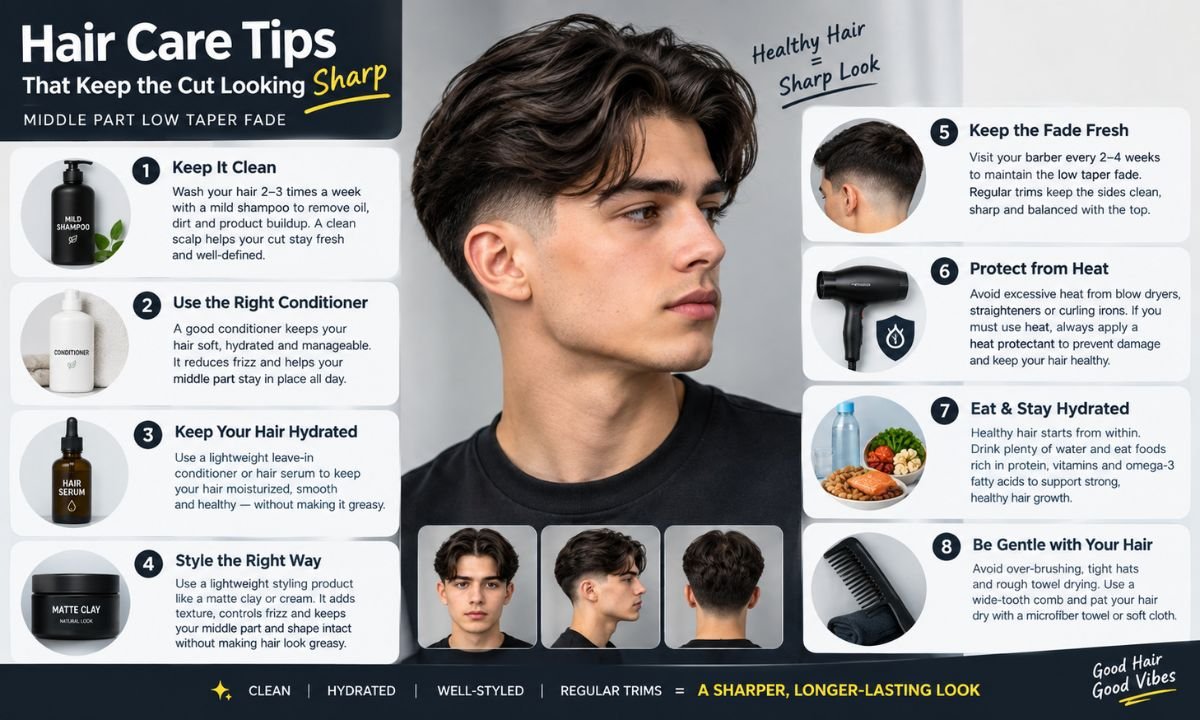
The best cut still falls apart on unhealthy hair. Good habits make your middle part low taper fade look better between trims. None of them take much time.
Wash your hair two or three times a week, not every day. Daily washing strips natural oils and leads to dryness. On off days, rinse with water and restyle.
Use a conditioner, especially if your hair is wavy or curly. It keeps the top soft and manageable. Rinse it out with cool water for extra shine.
Also, don’t forget your scalp. A tight, dry scalp causes flakes that show against a fade. A gentle scrub once a week keeps the skin fresh and clear.
Middle part low taper fade for receding hairlines

A receding hairline doesn’t rule out a center part. It just needs a smart plan. Keep the fringe slightly forward and textured to soften the temples.
Avoid slicking hair straight back with heavy product. That highlights the recession. A messy, lived-in top hides it better.
A low taper also helps because it draws attention to the neat sides. Talk to your barber about a custom shape. They see your hairline up close.
Middle part low taper fade for men over 30
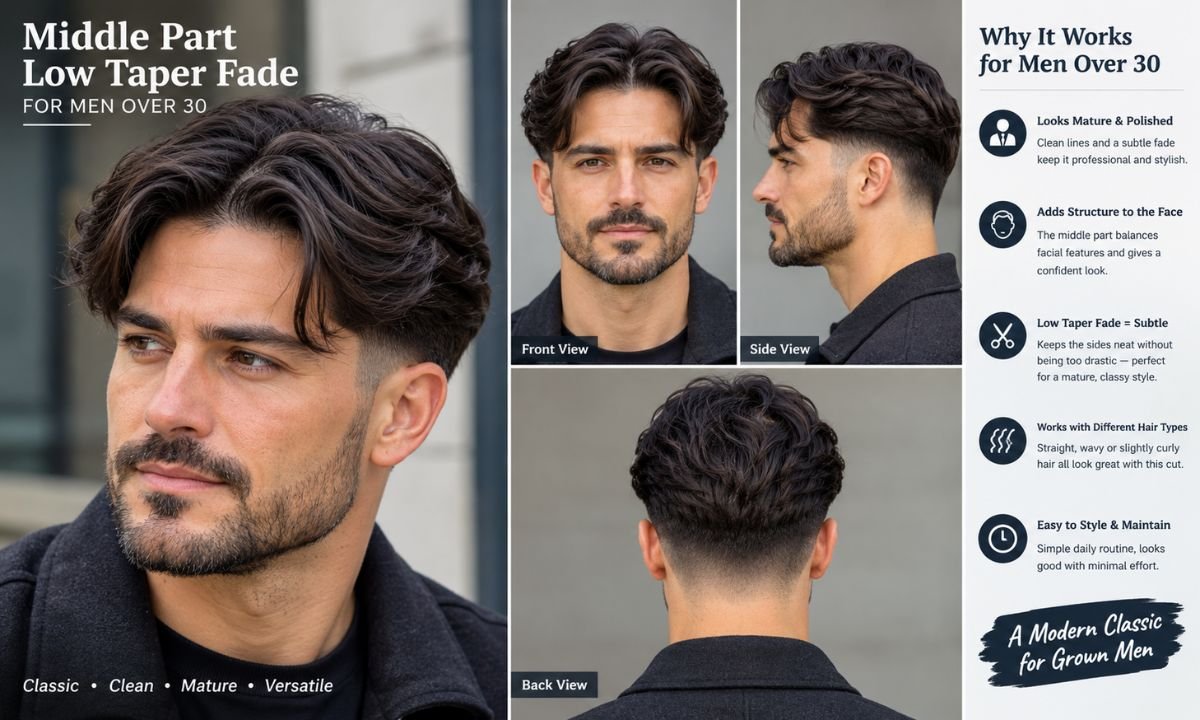
Your hair changes after 30, and that’s normal. Strands get finer and the temples may creep back a little. A middle part low taper fade handles both without much fuss.
Think of a friend who wore a slicked-back look for years. Once his hairline shifted, the style felt harsh on him. He switched to a textured center part with a low taper and finally liked his reflection again.
Keep the top around three inches and add a matte paste for grip. Skip anything glossy since shine highlights thin patches. A soft, lived-in finish looks younger and easier to wear.
Pair the cut with a clean neckline and a neat beard if you grow one. That mix looks sharp at work and relaxed on weekends. It also ages well, which most trendy cuts can’t claim.
Pairing the cut with a beard
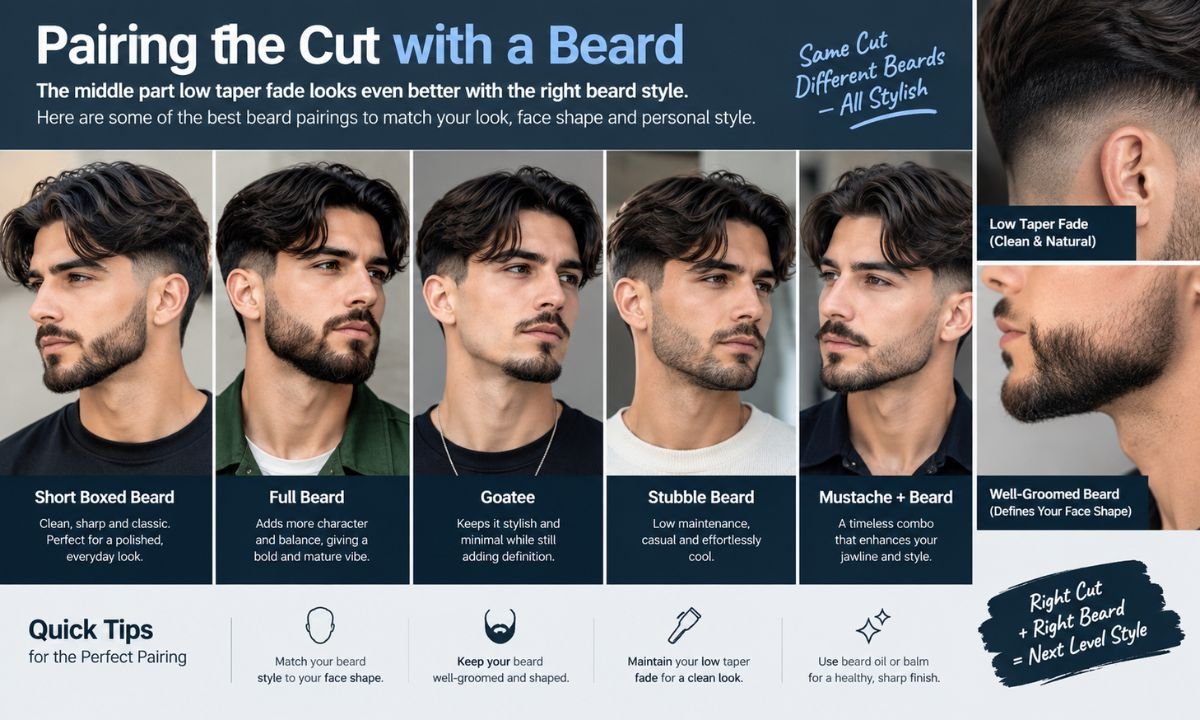
The cut pairs beautifully with facial hair. The low taper blends right into a beard, so the whole look feels connected. It’s a clean, cohesive pairing.
Match the beard length to the top. A short, groomed beard fits a short cut. A fuller beard suits a longer flow.
Ask your barber to fade the beard into the taper. That removes any hard line where hair meets face. It’s a small detail with a big payoff.
How much does it cost?
Prices vary by city and barbershop. A standard taper fade with styling usually costs more than a basic trim. Expect to pay more at a high-end shop.
Many barbers charge extra for a skin finish or beard blend. Ask before you sit down so there are no surprises. Clear prices build trust.
Tipping is common, so budget a little extra. Regular visits also make you a loyal client. Loyal clients often get better slots and attention.
Frequently asked questions
Why is Gen Z obsessed with middle parts?
Gen Z loves the middle part because it feels nostalgic and fresh at once. The 90s revival made it cool again. It also photographs well on social media.
The look is easy to wear and adapts to any hair type. It’s comfortable and doesn’t require complex styling. That simplicity appeals to a generation that values ease.
Which taper fade is best?
The best taper fade depends on your goals. A low taper suits soft, natural looks. A mid taper suits bolder styles.
If you want something safe and versatile, choose the low option. It grows out gracefully and works in most settings. You can always go higher next time.
Is mid taper fade good for the middle part?
Yes, a mid taper fade works well with a center part. It adds more contrast, so the top stands out. The look feels sharper and more modern.
Just remember it grows out faster than a low taper. You’ll need trims every two to three weeks. Choose it if you like a crisp, high-contrast finish.
How long should my hair be for a middle part?
You need at least two to three inches on top. That’s the minimum length for the split to show clearly. Four inches is a safe target for a natural look.
Thicker hair can go a bit shorter. Fine hair may need a little more length to cover the scalp. Ask your barber to check your density.
How do I stop my middle part from splitting too much?
Blow dry your hair while it’s slightly damp. Point the dryer forward and then let it fall into the part. That trains the hair to sit right.
A light hold product also helps. Use a bit of paste or cream at the roots. It keeps the divide neat without stiffness.
Does a middle part suit a round face?
It can, if you style it right. Add volume at the roots and keep the sides tight. That creates length and balance.
Avoid a flat, wide fringe on a round face. It can emphasize width. A textured, slightly lifted top works better.
Can I get a middle part with short hair?
Yes, but you need at least two inches on top. Shorter than that, and the part won’t show. A textured cut helps the split appear.
Ask your barber to leave enough length near the front. That’s where the part is most visible. Then style with a bit of clay.
Is a middle part low taper fade okay for the office?
Yes, it’s one of the safest modern cuts for work. The low taper looks neat, and the center part looks confident without being loud. Most dress codes accept it.
Keep the top tidy and the product matte for meetings. Save the messy, textured version for weekends. Your barber can show you both styles.
Which comb is best for a middle part?
A wide-tooth comb works for most hair types. It creates a clean part without tugging at your strands. Curly hair needs it even more, since fine combs cause frizz.
If you want a sharp line, use a tail comb for the split itself. Then switch to the wide-tooth comb to shape the rest. That combo gives you control and softness.
Does a middle part make hair thinner?
No, a part doesn’t cause hair loss. It only changes where your hair falls. Still, wearing the same tight split every day can stress the roots slightly.
Switch your part now and then, or wear it loose. Avoid heavy gels that pull on the scalp. If you notice unusual shedding, see a dermatologist.
How long does it take to grow out a middle part?
Most people need three to six months for a comfortable length. Hair grows about half an inch monthly, so patience matters. Trim the sides while it grows.
The low taper keeps things tidy along the way. That prevents the awkward stage from looking messy. You’ll feel more confident during the wait.
Final Thoughts
The middle part low taper fade is a smart mix of bold and clean. It suits many face shapes and hair types. It also looks good whether you’re dressing up or down.
Start by knowing your hair texture and face shape. Then bring photos to your barber and be specific about length. A few good products will do the rest.
Have you tried this cut yet? Tell us about your experience in the comments. Share this guide with a friend who needs a fresh look, and check back for updates as the trends change in 2026.
